Data Explorer 5.0 User Guide
Contents
Who is intended audience of the Data Explorer?
Downloading Desktop Application
Installing Desktop Application
Installing Third Party Database Command Line Tools
Staring Web version of the Data Explorer
Configuring Network and Services
Configuring Data Explorer to work in the Client-Server mode
Configuring Third-Party Database Command Line Tools
Changing settings for high DPI monitors
Configuring Users, Roles and Rights
Checking Installed Version and License
Organizing connections in folders
Developing and Executing ETL Scenarios
Creating New ETL or Data Integration Scenario
Organizing ETL scenarios in folders
Using Interactive ETL Designer
Using Drag and Drop with ETL Designer
Configuring ETL Editor and Designer
Working with ETL code Snippets
Exporting ETL Configuration to be used by standalone ETL Framework
Create configuration file for ETL Scenario
Create configuration file for standalone ETL Framework
Migrating Data and Schema Objects
Creating and Executing Data Migration Scenarios
Configuring Data Migration Wizard
Finding and Filtering Database Objects
By using Find Database Objects activity
By finding objects using Objects Browser built-in search
Viewing Tables, Views, Synonyms, etc.
Editing Tables, Views, Synonyms, etc.
Creating and profiling SQL queries and scripts
Creating Queries and SQL scripts using SQL Editor
Executing SQL Queries and Scripts
Creating Queries using Query Designer
Configuring SQL Editor and Designer
Executing Stored Procedures and Functions
Working with SQL code Snippets
Browsing and Viewing Files using File Connections
Browsing and Viewing Files using File Manager
Adding new root folder to the Objects Browser
Viewing, editing, creating, coping, moving, deleting and renaming files and folders
Changing File Manager configuration options
Refreshing, Filtering and Sorting Dataset
Applying Statistical Numerical and Date Functions
Changing Maximum Number of Rows to Display in the Grid
Changing scheduler configuration properties
Getting Started
What is Data Explorer?
Fully integrated Universal Database Development, Data Discovery, Data Integration and Data Migration IDE.
If you, like us, work with a data on daily basis you probably use a variety of tools which serve different needs. Among these tools Data Explorer is unique in a sense that it seamlessly integrates most common data-related functions in one attractive package.
The clear advantage of the Data Explorer compare to other offerings is that users will need to learn and master just one tool which natively supports a great variety of data sources and data-manipulation scenarios.
Who is intended audience of the Data Explorer?
Among others the following groups are the once who most likely will find Data Explorer helpful in their day-to-day jobs.
|
Group |
Use Cases |
|
ETL and Data Integration Developers |
· Creating and executing data integration and ETL scenarios · Validating data, working with messy data, cleaning it up, transforming it from one format into another |
|
Developers |
· Running and Profiling SQL queries · Finding and Browsing Database Objects · Exploring Entity Relationships · Creating Stored Procedures and Functions |
|
Database and System Administrators |
· Creating and executing DDL scripts · Profiling and monitoring SQL queries and sessions · Scheduling batch SQL tasks and ETL scenarios |
|
QA and Developers in Test |
· Preparing test data using simple data migration scenarios · Creating cohesive and portable data sets |
|
Data Analysts and Data Architects |
· Data Mining and Finding Dependencies · Creating and delivering data-driven reports |
|
Business Analysts |
· Visualizing Data in different formats and from different sources · Running interactive data transformations · Applying Statistical and Date functions to the Datasets |
Data Explorer Editions
While we created Data Explorer as a universal data-manipulation tool we understand that each user’s mileage may vary. You might not need a particular piece of the functionality at the movement so why pay more? With that in mind we offer four editions of the Data Explorer:
|
Features |
SQL |
ETL |
Pro |
Enterprise |
|
Pluggable SQL and Non SQL connectors |
Yes |
Yes |
Yes |
Yes |
|
Pluggable transport protocols |
Yes |
Yes |
Yes |
Yes |
|
Object browser, global search, drag and drop, wizards, visual designers, code-aware editors |
Yes |
Yes |
Yes |
Yes |
|
Data Discovery |
Yes |
Yes |
Yes |
Yes |
|
One Click Data Migration |
Yes |
Yes |
Yes |
Yes |
|
Universal Database Development |
Yes |
No |
Yes |
Yes |
|
Data Integration and ETL Development |
No |
Yes |
Yes |
Yes |
|
Built-in Scheduler |
No |
No |
No |
Yes |
|
Role-based security and audit |
No |
No |
No |
Yes |
|
Ability to deploy to the cloud |
No |
No |
No |
Yes |
|
Support |
By email |
By email |
By email |
By email |
|
Flexible License |
No |
No |
No |
Yes |
You can upgrade (or downgrade if you are on subscription plan) to any edition at any time. Also, thanks to flexible plugin architecture, Data Explorer can be configured beyond default editions.
Downloading
Data Explorer can be downloaded from our web site at https://www.toolsverse.com/downloads.
Download installer or Data Explorer in the archive format for the operating system that fits your needs.
On Windows you can download installer or archive with a packaged JVM (32 or 64 bits). Data Explorer requires at least Java 1.6.
Data Explorer is perfectly functional in a pure desktop mode just like any other regular Windows, OS X or Linux program and does not require a server.
When server component of the Data Explorer is detected by the client it automatically switches to the client-server mode. In this mode all heavy lifting is done on the server which increases security and improves scalability. Some pieces of functionality, such as Scheduler, only available when there is a server component.
If server component is installed Data Explorer can be also used in the Web mode. The fully functional Web client is compatible with all modern browsers including Internet Explorer.
One of the benefits of using server component is ability to deploy Data Explorer to the cloud, for example Amazon AWS.
Downloading Desktop Application
Look for clearly marked desktop downloads. On Windows and OS X Data Explorer can be downloaded as an installer. Use archive downloads for other operating systems.
Downloading Server
Look for clearly marked server downloads. You can download either war archive or packaged WEB application.
The difference between these two is that the WAR file can be installed as is. Web container will automatically explode war file and create Web application. Packaged WEB application should be manually un-packaged and placed in the specific folder.
Installing
There are two ways to install Data Explorer: using installer or extracting files from the archive. The server component does not have an installer.
Installing Desktop Application
When using installer just execute it and follow instructions on the screen.
OS X installer is offered in a form of self-extracting DMG file. When prompted drag and drop Data Explorer folder to the Applications.
When installing from archive you will need to manually extract files using utility provided by operating system. All files are contained in the enclosing folder named dataexplorer-version.
Installing from archive will not add any entries to the Start menu, add desktop launchers or register the software in the registry.
Installing Server
Data Explorer server component requires Java servlet compatible Web container. Some of the recommended containers:
· Tomcat
· JBoss
· GlassFish
· WebLogic
· WebSphere
Server component can be downloaded either as a WAR file or as a packaged WEB application. The difference between these two is that the WAR file can be installed as is. Web container will automatically explode war file and create a Web application. Packaged WEB application should be manually un-packaged and placed in the specific folder. Either way Web server needs to be restarted.
All files of the packaged WEB application contained in the enclosing folder named dataexplorer. This folder is going to be the root of your new Web application.
Using Tomcat 7.0 installed on the Windows computer under c:\tomact 7 folder:
Installing from WAR file
1. Make sure Tomcat is not running
2. Copy dataexplorer.war file into Web applications root folder: c:\tomact 7\webapps
3. Restart Tomcat
4. Ping server: http://localhost:8080/dataexplorer/ide. If response is “WEB services are configured and ready to use.” you have properly configured, up and running Data Explorer server component.
Installing from packaged WEB application
1. Make sure Tomcat is not running
2. Manually un-package dataexplorer-web-4.0 file into Web applications root folder: c:\tomact 7\webapps
3. After un-packaging you should have a folder c:\tomact 7\webapps\dataexplorer which contains all required files
4. Restart Tomcat
5. Ping server: http://localhost:8080/dataexplorer/ide. If response is “WEB services are configured and ready to use.” you have properly configured, up and running Data Explorer server component.
Installing Plugins
Data Explorer comes with all required files so you are not going to be installing plugins anytime soon, if ever. However if you do, installing is as easy as copying plugin files into app_home\plugin folder on the client and app_home\lib folder on the server. You will need to restart desktop application and server after you are done.
Installing License
When first downloaded, Data Explorer includes a fully functional Enterprise Evaluation license. There are no limitations on what application can do during evaluation period but this license will expire after the 20 days from the first use.
If you wish to continue using Data Explorer after evaluation period ends you will need to purchase one of the commercial licenses. Please check out https://www.toolsverse.com/purchase for more information.
Each client and server requires its own license.
The license can be provided in two forms: as a license file (default) or (by additional request) as a jar file. Jar file can be requested if customer wants to reduce dependencies on the external files.
Once obtained installing license is as easy as:
When it is provided as a license file (*.lic)
1. Make sure client and server are not running
2. Copy *.lic file into app_home\license folder
3. Restart desktop application and server
When it is provided as a Jar file
1. Make sure client and server are not running
2. Copy *.jar file into app_home\lib folder
3. Restart desktop application and server
Installing JDBC drivers
Each copy of the Data Explorer comes with the following JDBC drivers:
· DB2
· Informix
· Microsoft SQL Server
· Sybase Advanced Server
· MySQL
· Oracle
· PostgreSQL
· Java DB (Derby)
They are located in the app_home\jdbc folder. Data Explorer automatically recognizes (on start-up) and dynamically loads (when needed) jdbc drivers under this folder.
To install new jdbc driver just add a sub folder under app_home\jdbc and put all required files there. Restart Data Explorer.
Installing Third Party Database Command Line Tools
Data Explorer can seamlessly integrate itself with third-party database command line tools. For example when Oracle Client is installed Data Explorer can natively run high-performance data loads (through sql*load) or auto-trace queries (through sql*plus).
Currently Data Explorer provides integration with the following third-party command line database tools:
· DB2 – db2cmd, db2exfmt
· Informix -DbAccess
· Microsoft SQL Server – Microsoft bcp
· Sybase Advanced Server – Sybase bcp
· MySQL - mysql
· Oracle – sql*plus, sql*load
· PostgreSQL - psql
These tools do not come pre-installed with a Data Explorer. Please visit vendor web sites to download and install third-party command line database tools.
Note: Most third-party database clients require OS restart after installing.
Starting Data Explorer
How to start Data Explorer depends on the operating system and mode you are using.
If you are running Data Explorer in the client-server or Web mode enter user name and password after Data Explorer has started. Default: admin/admin.
Starting Desktop Application
Windows
In the Start Menu select Data Explorer. Or simply execute dataexplorer.exe any way you like.
OS X
Double click on the dataexplorer.app application bundle under Data Explorer folder in Applications.
Linux/Unix
Open a shell and change directory to the Data Explorer installation directory. Execute dataexplorer.sh shell script.
All
On all operating systems you can start Data Explorer by clicking on executable dataexplorer.jar.
Starting Server
Data Explorer server component is a Web application. So if it is correctly deployed starting server equals to staring your Web container, for example Tomcat.
Staring Web version of the Data Explorer
Assuming Data Explorer Web application has been deployed to the Tomcat server running on the local computer, open the following URL in your favorite Web browser: http://localhost:8080/dataexplorer/wings/
Enter user name and password after Data Explorer has started. Default: admin/admin.
Note: Internet Explorer (starting from version 9) must be configured to open sites in the compatible mode for the domain where Data Explorer Web application is deployed.
Note: Latest versions of the Firefox are experiencing problems when running heavy lifting JavaScript. We recommend switching to Chrome or any other WebKit browser.
Configuring
Data Explorer comes pre-configured to provide highest levels of performance and compatibility.
Most configuration options can be changed from the Data Explorer Preferences widget.
Opening Preferences from the Menu
· OS X – DataExplorer->Preferences
· All other operating systems – Tools-> Preferences
Opening Preferences from the Application Toolbar

When you are done changing configuration options you will need to save them:
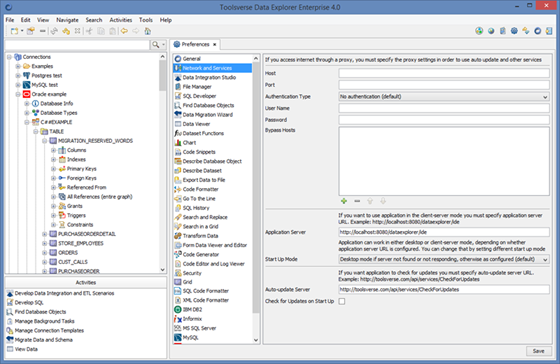
Configuring Network and Services
To configure HTTP proxy, application server, start-up mode, auto-update mode and auto-update server go to Preferences->Network and Services.
Configuring Data Explorer to work in the Client-Server mode
In addition to the desktop mode Data Explorer Enterprise edition can work in the client-server and Web modes. When working in either of these modes the following additional functionality is available:
· Role based security
· Audit
· Scheduling ETL and SQL tasks
By default Data Explorer starts in the desktop mode. Assuming that you already installed server component of the Data Explorer and it is up and running you need to configure server URL.
To configure server URL go to Preferences->Network and Services.
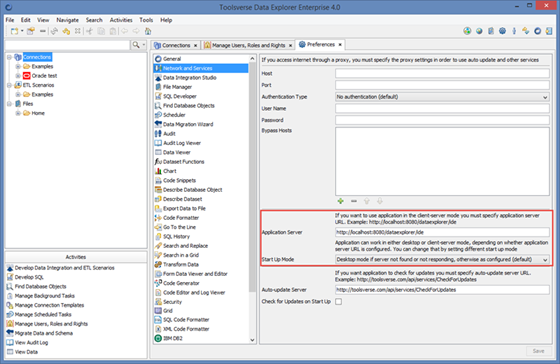
If Application Server URL is configured Data Explorer assumes that there is a server component so it can start in the client-server mode. You can change start-up behavior.
Possible Start Up Modes:
· Desktop mode if server not found or not responding. Otherwise as configured – in this mode if server URL is configured but Data Explorer cannot start in the client-server mode it will offer to start in the desktop mode ignoring a server component
· Always as configured – in this mode if server URL is configured but Data Explorer cannot start in the client-server mode it will display error message and exit
· Always desktop mode – in this mode Data Explorer always starts in the desktop mode regardless of the server URL settings
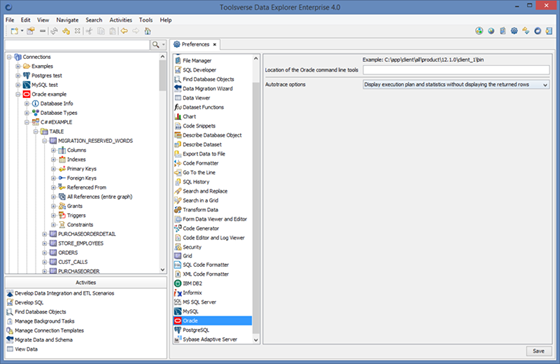
Configuring Third-Party Database Command Line Tools
Most command line database tools, such as Oracle client, if installed using official vendor installer do not require any additional configuration. They will be automatically recognized and used by Data Explorer.
In some cases you will need to specify directory where these tools are located and other parameters. You can configure tools for the following databases:
· DB2
· Informix
· Microsoft SQL Server
· Sybase Advanced Server
· MySQL
· Oracle
· PostgreSQL
Note: If you are planning to use Oracle TNS aliases located in the ORACLE_HOME\network\admin and not sure if ORACLE_HOME or TNS_ADMIN environment properties are set you will most likely need to configure Location of the Oracle command line tools.
To configure third-party database tools go to Preferences->Database name.
Changing Look And Feel
By default Data Explorer uses native look and feel for the host operating system.
The following look and feels are available:
|
OS |
Look and Feel |
|
Windows |
· Native (default) · Classic · Quaqua |
|
OS X |
· Native (default) · Quaqua |
|
All |
· Numbus (default on Linux/Unix) · PGSLookAndFeel · Metal · CDF/Motif |
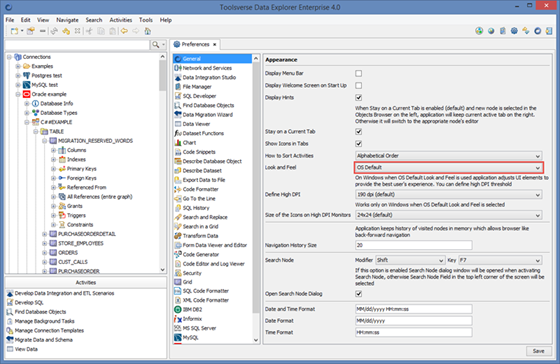
To change look and feel go to Preferences->General and select Look and Feel.
Adding New Look and Feel
You can add new look and feel in three simple steps:
1. Copy look and feel jar file into app_home\lib folder. If there are other files copy them in the same folder
2. Create empty file with the same name as a jar file and extension laf
3. Restart client and change look and feel
Note: Not all look and feels are compatible with Data Explorer. In worst case scenario it will not be able to start. To fix that:
1. Open file app_home\config\ide_settings.properties in your favorite text editor
2. Remove line starting from local.general.lookandfeel. Save
3. Restart Data Explorer
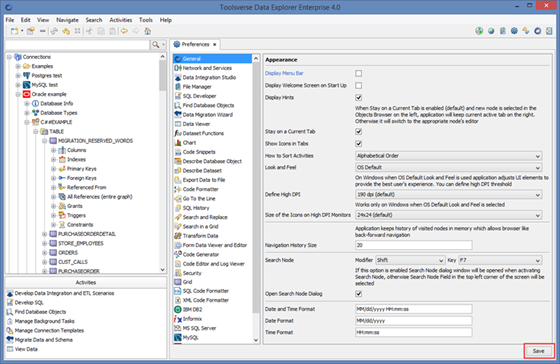
Configuring Appearance
To change what to display and how to display go to Preferences->General and change options on the top section of the Preferences widget.

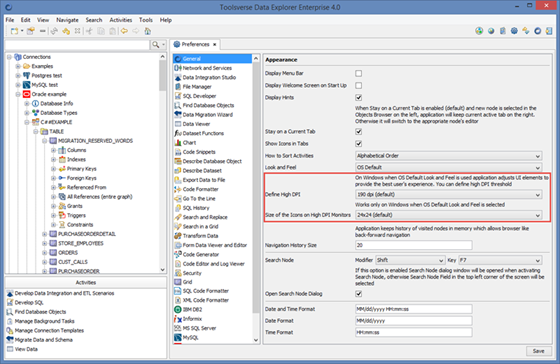
Changing settings for high DPI monitors
When default look & feel is set Data Explorer automatically adjust icon size and other UI elements to provide the best user’s experience on high DPI monitors. Typically you don’t need to do anything but you can manually set icon size and minimum DPI. Please remember that these settings work only on Windows and only for default look & feel. On OS X operating system automatically scales images on “retina” displays.
To configure high DPI settings go to Preferences->General and change high DPI options.
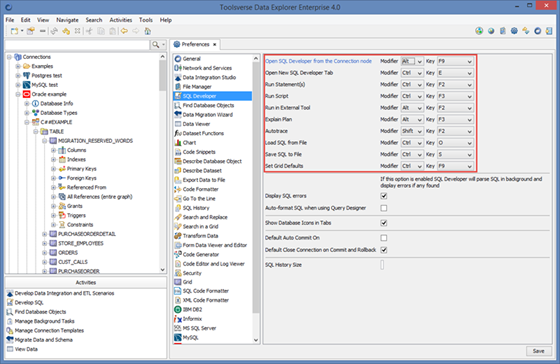
Changing Keyboard Shortcuts
Most components of the Data Explorer are loaded dynamically as a plugin modules. As such each of them has its own section in the Preferences widget.
To configure keyboard shortcuts for the particular component go to Preferences->Component name and select keyboard shortcut that you want to change.
Changing JVM Parameters
To change JVM parameters for the desktop application:
1. Open DATA_EXPLORER_HOME\appstart.properties in your favorite text editor
2. Change line containing app.vm.options
3. Save and restart Data Explorer
To change server JVM parameters please read documentations for your application server.
Configuring Users, Roles and Rights
In the client-server and Web modes Data Explorer allows you to setup who-can-do-what. For example you can disable access to the certain connections and functions for the certain users.
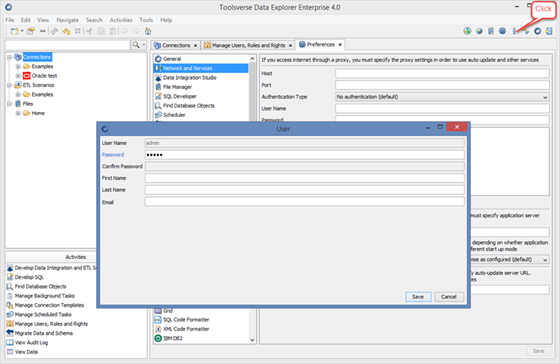
Managing users
To create or edit user click Activities->Manage Users, Rights and Roles->Users Tab.
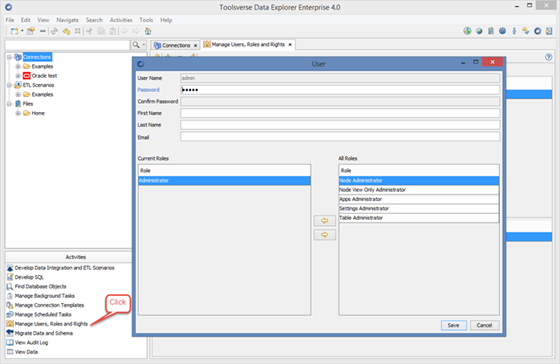
You can change user name, password and email address and also assign roles to the user. Once user is created you cannot change user name.
To save changes click Save button.
Each user can have multiple roles assigned.
Not editable, pre-defined roles:
· Administrator – unrestricted access to all functions and resources
· Apps Administrator – unrestricted access to all activities and plugins
· Node Administrator – unrestricted access to all nodes
· Node View Only Administrator – view only access to all nodes
· Setting Administrator – can change configuration settings which affect other users
Managing Roles
To create or edit user click Activities->Manage Users, Rights and Roles->Roles and Rights Tab.
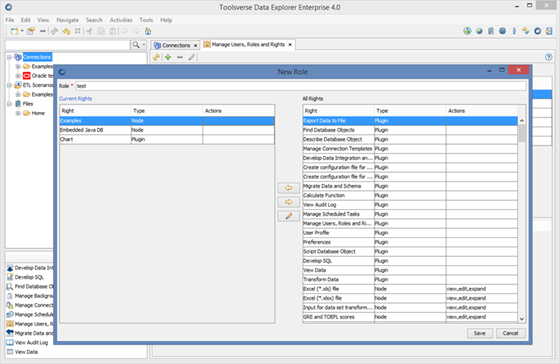
You can set role name and assign allowed actions to some roles. Once role is created you cannot change name.
To save changes click Save button.
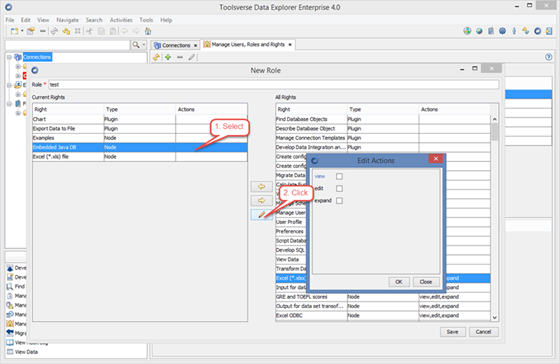
Right to access node can have actions associated with it such as right to view properties, right to edit node and right to expand node.
To assign actions to the right select right on the left panel and click Edit button.
Changing user’s profile
Currently logged in user can change his\her password and other properties at any time.
To edit user’s profile select Tools->User Profile.
User name cannot be changed.
Data Explorer User Interface
Main Window Layout
The Data Explorer GUI main window contains a navigation area to the left and working area to the right. Most of the commands in the Data Explorer menu are duplicated in the Data Explorer toolbar and Objects Browser right click popup menu.
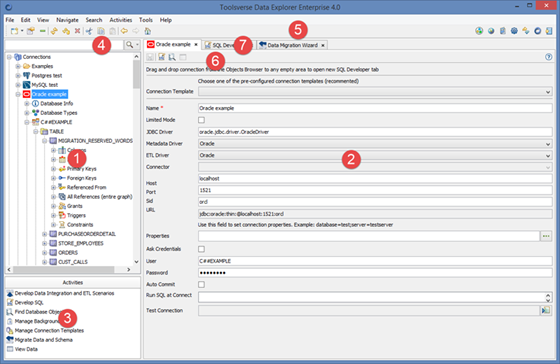
1. Objects Browser
2. Node Editor
3. Activities and Actions
4. Node Search
5. Data Explorer Toolbar and Menu
6. Node Editor or Activity Toolbar
7. Activity (plugin)
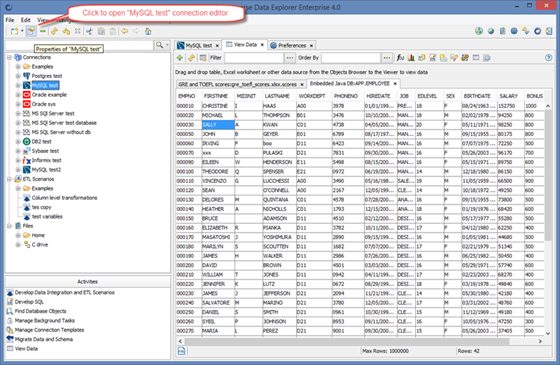
Objects Browser
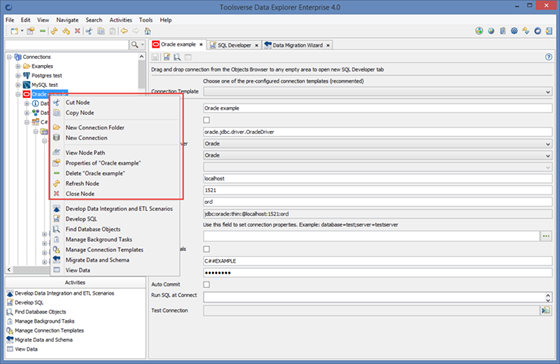
Data Explorer Objects Browser displays all objects (nodes) supported by Data Explorer. Use right click popup menu, Data Explorer toolbar and Data Explorer menu to access actions associated with the current node.
Some of the actions associated with the node:
Navigation
Data Explorer supports Web browser-like navigation. It remembers visited nodes so you can navigate back and forth using navigation buttons. Home button always returns you to the root node. You can change the size of the “history” of visited nodes by changing Preferences->General->Navigation History Size.
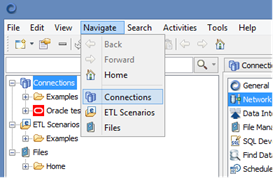
You can jump to any top level node by choosing them from the Navigate menu.
Finding and Filtering Nodes
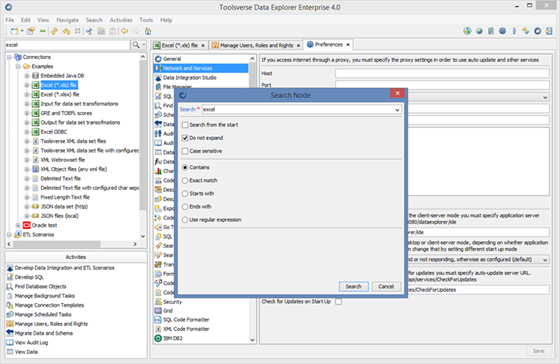
To search for the node select a text field in the search toolbar, enter text to search and press Enter. Extended search provides more search options. To use extended search select Search->Search Node.
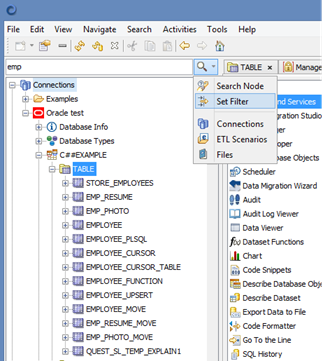
When filter option is available you can filter nodes. For example when looking for a particular table you can select a Table node in the Objects Browser, enter part of the table name and select Set Filter. To clear filter clear the text field and select Set Filter again.
Node Editors
When user selects a node in the Objects Browser Data Explorer opens a tab to the right with detailed information about the node. If node is editable you can change node’s properties and save them by clicking Save button.

Node Editor usually appears in the first tab to the right and is getting replaced when new node is selected in the Objects Browser but there are cases when multiple nodes of the same type can be displayed at the same time.
You can always open editor for the currently selected in the Objects Browser node by clicking on Properties of… button in the Data Explorer toolbar or Objects Browser right click popup menu.
Activities
Activities is what user can actually do. For example user can Develop SQL, Manage Connection Templates, Develop ETL, etc. Each activity is a mini application (plugin) integrated into Data Explorer. Activities are loaded dynamically when requested by user and displayed in their own tabs to the right. In opposite to the Node Editor Activity tabs stay on the screen all the time unless manually closed.
You can select activity either from the Activities list to the left or from the Activities menu.
Working with Tabs
Data Explorer uses tabs to organize GUI. You can close tab using one of the following methods:
· Click small [x] button in the right corner of the tab
· Open tab popup menu and choose appropriate action
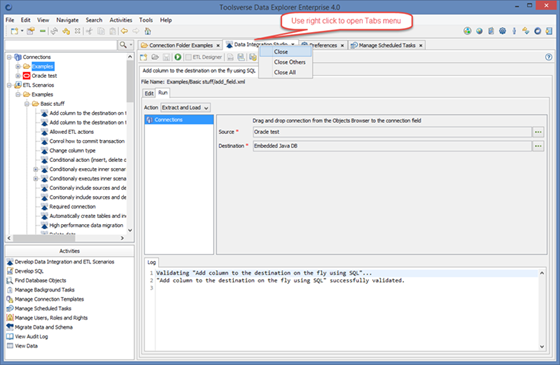
Node Editors and Activities are two types of tabs displayed to the right, in the working area of the Data Explorer GUI. It was already said that Node Editors are usually displayed in the first tab and are getting replaced when new node is selected in the Objects Browser. Activities can be anywhere and they never closed unless closed manually. That said there are two distinct configurable behaviors:
· Stay on the current tab (default) – when new node is selected in the Objects Browser to the left, Data Explorer will keep current active tab to the right
· Always select Node Editor - when new node is selected in the Objects Browser to the left Data Explorer will switch to the appropriate Node Editor
You can change behavior using Preferences->General->Stay on the Current Tab.
Working with Grids
Use mouse or Shift+Arrows to select cells in the grid.
All grids support the following features using right click popup menu:
To quickly re-order grid click column’s header.

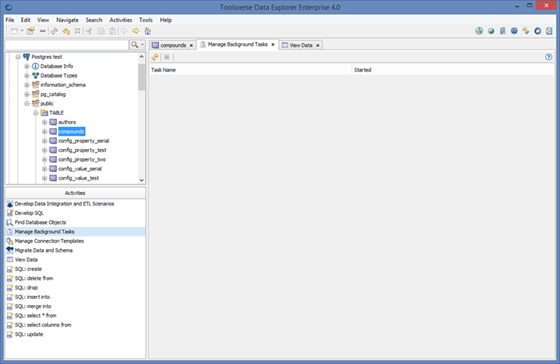
Background Tasks
Data Explorer uses background tasks to perform long running operations such running SQL, downloading updates, etc. There can be multiple background tasks running at the same time and until all of them are finished or manually cancelled you cannot exit Data Explorer. To view or cancel currently running background tasks click Activities->Manage Background Tasks.
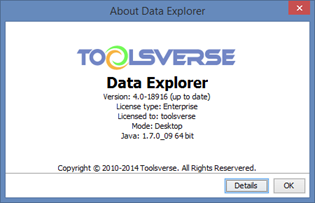
Checking Installed Version and License
To check installed version and license click Help->About.
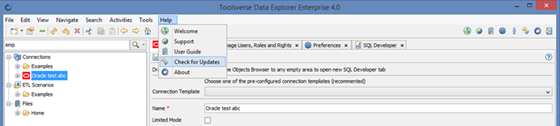
Checking for Updates
To check for updates click Help->Check for Updates. Follow instructions on the screen to download and install updates.
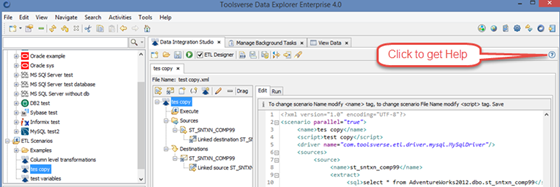
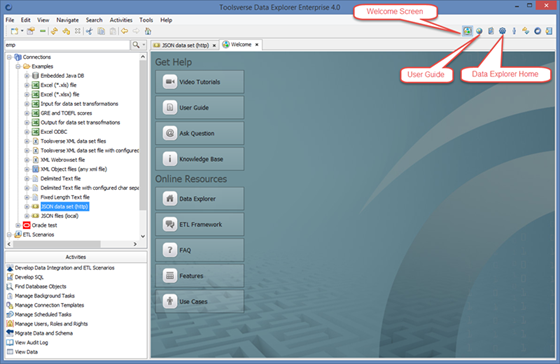
Getting Online Help
To get online help for the currently selected tab look of the help icon in right top corner of the tab:
Other support resource are one mouse click away:
Creating Connections
Data Explorer uses SQL and Non SQL connections to access data sources such as relational databases, files, etc. Connections are shared between different activities (plugins).
Creating Connection Templates
Data Explorer uses templates to pre-populate connection properties such as drivers, URL patterns, etc.
To open connections template editor select Activities->Manage Connection Templates.
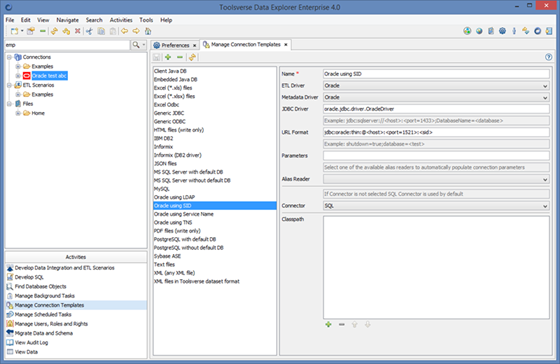
Follow hints on the screen to create a new template. To save template click Save button.
When creating a template you can use tokens <token=value> for the URL Format and Parameters fields.
Template:
Connection Editor:
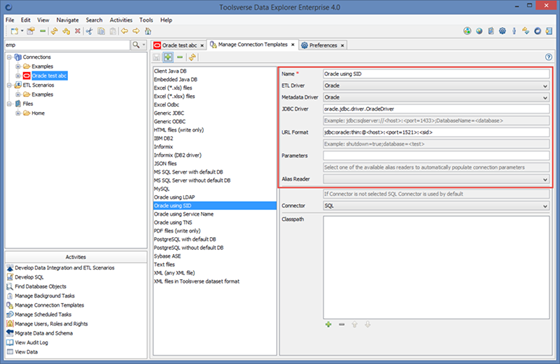
The following fields are unique to Data Explorer compare to other similar tools:
· ETL Driver – a driver used for data type translation, code generation and support for external tools. Choose one of the pre-existing drivers. If there is no driver for your database choose Generic Jdbc for SQL data sources and Generic File for file-based data sources.
· Metadata Driver – a driver used for discovering and displaying metadata such as database objects, tables, constraints, etc. Choose one of the pre-existing drivers. If there is no driver for your database choose Jdbc.
· Alias Reader – a driver which can read connections used by third party applications, such as SQL*Plus.
· Connector – a driver used to read and write data sources. Choose SQL or leave it blank for databases or choose one of the supported file formats for file-based data sources.
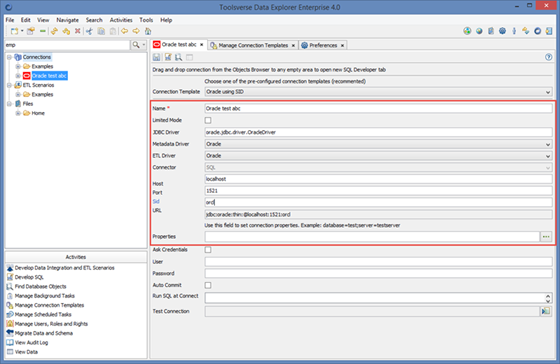
Creating Database Connections
Database connections are used to access relational databases. Database connection requires JDBC or ODBC driver.
Please remember that in the client-server and Web modes all connections are managed by server so the resources must be accessible from the server. For example if you are creating connection to the Oracle database Data Explorer server component must be able to connect to this particular instance of the Oracle database.
To create a new database connection select Connections node in the Objects Browser or any node under and click File->New Connection.
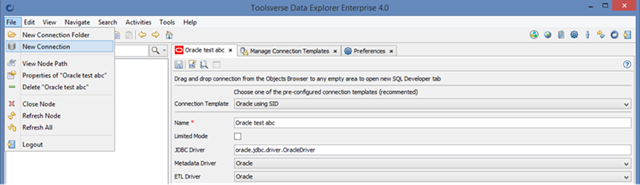
Choose suitable Connection Template from the drop down and fill in fields by following hints on the screen. Click Save when you are done.
Alternatively, if there is no suitable connection template you can just enter all fields manually.
The following fields are unique to the Data Explorer compare to other similar tools:
· ETL Driver – a driver used for data type translation, code generation and support for external tools. Choose one of the pre-existing drivers. If there is no driver for your database choose Generic Jdbc.
· Metadata Driver – a driver used for discovering and displaying metadata such as database objects, constraints, etc. Choose one of the pre-existing drivers. If there is no driver for your database choose Jdbc.
· Alias Reader – a driver which can read existing connections used by third party applications, such as SQL*Plus.
· Connector – a driver used to read and write data sources. Choose SQL or leave it blank for SQL data source.
· Limited Mode – limited mode exists for cases when you want to use Data Explorer as a data entry tool. By enabling limited mode for the connection you will limit number of things which can be displayed when browsing database.
· Ask Credentials – if this option is enabled Data Explorer always requests user name and password. It is useful when you don’t want system to store database credentials.
Creating File Connections
File connections are used to access file-based data sources such as Excel, JSON, etc.
Please remember that in the client-server and Web modes all connections are managed by server so the resources must be accessible from the server. For example if you are creating connection to the files in the FTP site Data Explorer server component must be able to connect to this FTP site.
To create a new file connection select Connections node in the Objects Browser or any node under and click File->New Connection.
Select suitable file Connection Template and fill in required fields such as file name. Click Save when you are done.
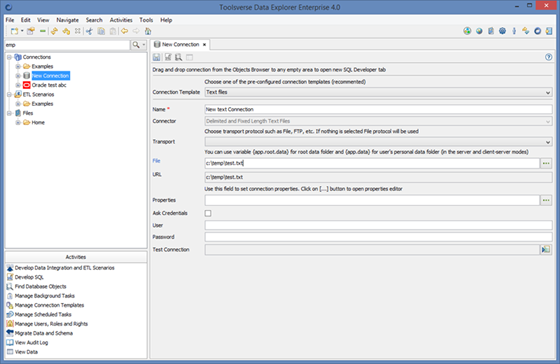
When setting up file based connection the following fields are available:
· Transport – the transport protocol used to read and write files. You can choose File, FTP, SFTP or HTTP. File is a default.
· File – the file name or URL. Enter URL if file is located in the FTP, SFTP or HTTP server. You can use wildcards such as “*” and “?”.
· User – the user name for FTP or SFTP connection.
· Password – the password for FTP or SFTP connection.
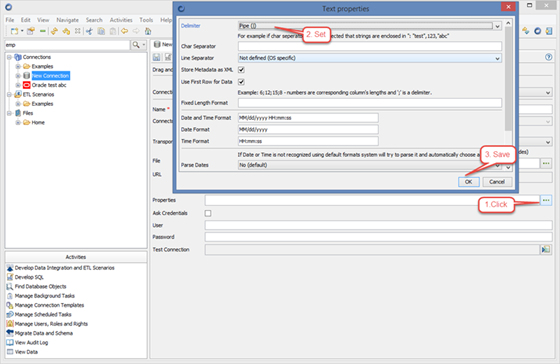
For the file based connections it is usually required to set connection’s properties such as delimiter for CVS files or encoding for XML. Click […] button to the right of the Properties field to set connection’s properties.
Organizing connections in folders
You can organize connections in folders. To create a new folder select Connections node in the Objects Browser or any node under and click File->New Connection Folder. Change name and save folder.
Now you can create connections under this folder.
Developing and Executing ETL Scenarios
Data Explorer includes a Data Integration and ETL IDE.
The following features are available when developing ETL and data integration scenarios:
· Visual ETL designer with drag and drop support
· Wizards for ETL constructs and code patterns
· ETL-language-aware code editor
· Two way link between designer and editor: everything you do in designer automatically and in real time produces high quality code in editor and vice versa
· Background code parsing and syntax errors reporting
· Color highlighting
· Code completion
· Code snippets and built-in examples
· Code formatting
· Automatic form creation to capture connections and parameters for the scenario
· Ability to execute ETL scenario in the background
· Ability to schedule ETL (enterprise edition)
· Ability to execute ETL by the server component (enterprise edition)
· Ability to define roles and rights for the developers (enterprise edition)
· Audit for ETL (enterprise edition)
Writing ETL Scenarios
ETL scenario are created using XML based language.
· Read more about ETL Scenario language.
· Read how to write data integration and data migration scenarios.
· Look at some examples of the scenarios.
Creating New ETL or Data Integration Scenario
To create a new ETL Scenario select ETL Scenarios node in the Objects Browser or any node under and click File->New ETL Scenario.
Select appropriate ETL scenario type, fill in required fields and click OK.
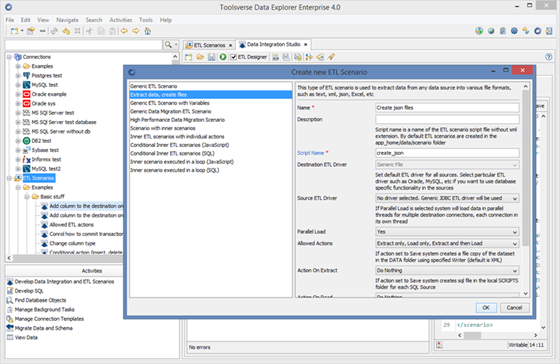
After scenario is created and added to the Objects Browser you can start adding sources, destination, tasks and other artifacts. Click Save to save changes.
Organizing ETL scenarios in folders
You can organize ETL scenarios in folders. To create a new folder select ETL Scenarios node in the Objects Browser or any node under and click File->New ETL Folder. Change name and save folder.
Now you can create ETL scenarios under this folder.
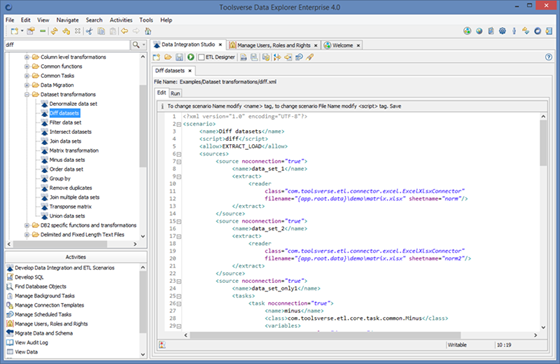
Working with ETL Editor
Data Explorer contains ETL Editor used to edit ETL scenarios. Each ETL scenario is opened in its own tab.
The following functionality is available when using ETL editor:
· Code parsing and syntax errors reporting
· Color highlighting
· Code completion
· Code snippets and built-in examples
· Code formatting
· Folding and unfolding
· Loading and saving ETL scenarios
To open ETL scenario in the editor select scenario in the Objects Browser. There is no limit on how many scenarios can be opened at the same time.
The editor area looks like this:
Using auto completion
ETL editor supports auto completion for ETL tags and attributes. To activate auto completion use Ctrl+Space.
Working with syntax Errors
ETL editor constantly checks for syntax errors in the background. When any error is found Data Explorer displays it in the bottom of the editor.

When you correct an error the error message disappears.
Formatting Code
To format ETL scenario code click Format Code button.
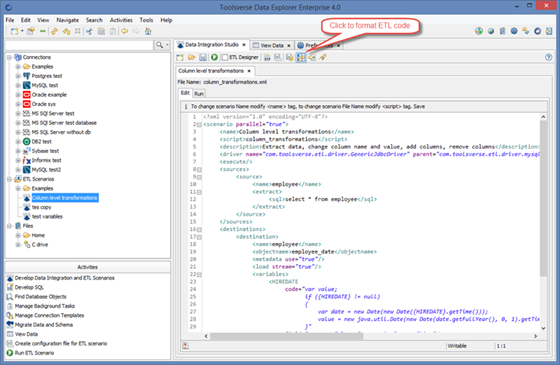
You can change formatting options under Preferences->XML Code Formatter.
Using Interactive ETL Designer
You can create ETL scenario without wring a single line of code. To enable ETL Designer click on ETL Designer check box in the ETL editor toolbar.
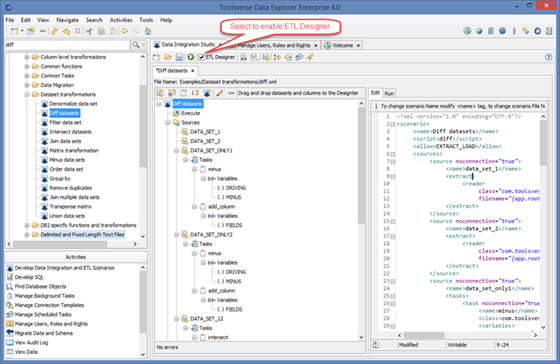
The following functionality is available in the ETL Designer:
· Two way link between designer and editor: everything you do in designer automatically and in real time produces high quality code in editor and vice versa
· Support for drag and drop from the Objects Browser for sources, destinations and variables linked to the dataset columns
· Ability to add, edit and delete ETL artifacts such as scenario, sources, destinations, tasks, variables and inner scenarios using interactive wizards
· Ability to Copy and Paste ETL artifacts between different opened scenarios
· Ability to quickly enable and disable sources and destinations
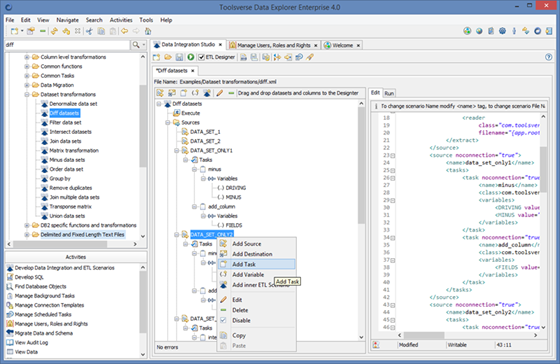
Using Drag and Drop with ETL Designer
When creating and modifying ETL scenario in the designer it is possible to use drag and drop. Just select a dataset in the Objects Browser and drop it to the designer:
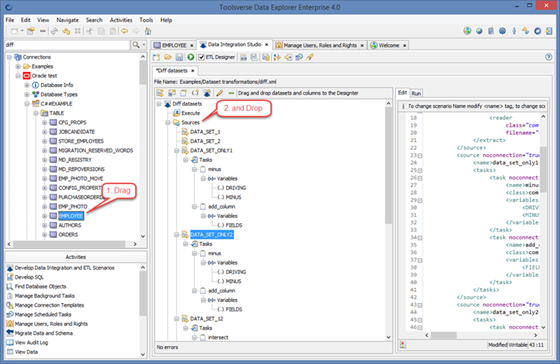
You can drag and drop practically any dataset, from database table and view to the JSON or XML file and Data Explore will automatically add source or destination.
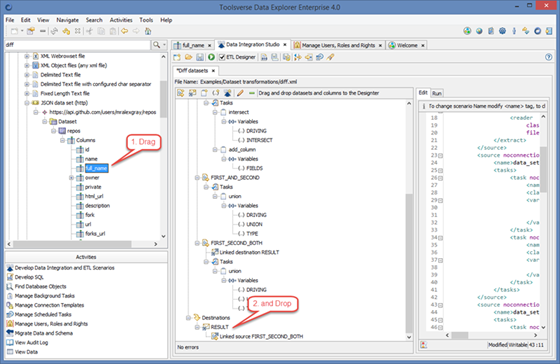
You can also drag and drop dataset columns which will automatically add scenario variables. Using variables you can map source column to destination, change column type, exclude column, calculate column value and much more.
Configuring ETL Editor and Designer
To configure ETL editor and designer go to Preferences->Data Integration Studio.
Running ETL Scenario
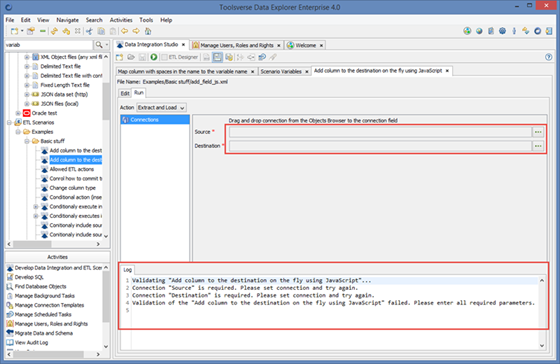
Scenario can be executed directly from the ETL editor. Select Run tab (1), select Action (2), enter required connections and variables (3) and click Run ETL Scenario (4) button.
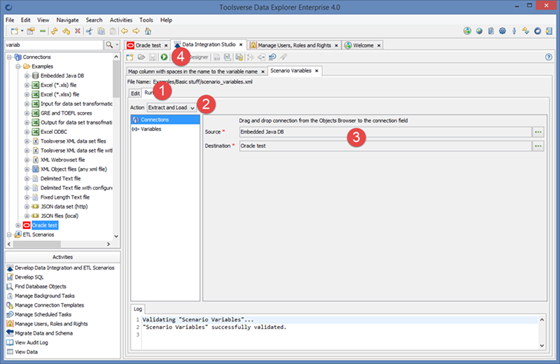
Data Explorer runs ETL scenarios in the background so you can continue working while scenario is running. You can run multiple ETL scenarios at the same time. System automatically redirects output to the Log tab so you can watch progress in real time. You can cancel running scenario at any time.
Data Explorer automatically validates entered connections and variables and displays appropriate messages in the log.
Working with Run-Time Errors
When there is a run-time error Data Explorer displays it in the Log tab. You can click on error button in the middle of the screen to go to the place in the ETL scenario where error occurred.
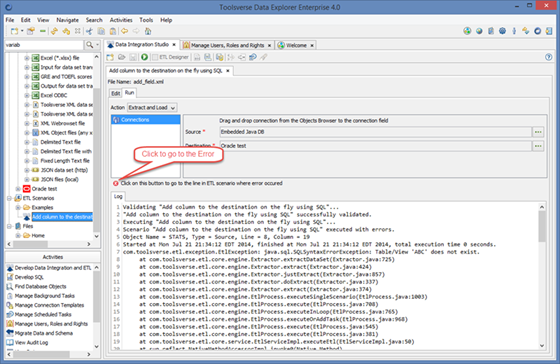
When possible Data Explorer also displays last executed SQL.
Scheduling ETL Scenarios
You can schedule ETL scenario using built-in crone-based scheduler.
Note. Since scheduler runs on the server you can schedule ETL scenarios only when using Data Explorer Enterprise edition and only in the client-server or Web modes.
To schedule ETL scenario click Schedule button in the ETL editor toolbar, fill in all required fields and click OK.

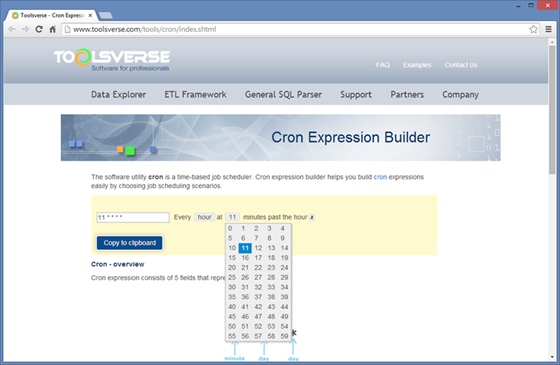
When specifying When to Run ETL scenario you need to enter a standard cron scheduling string. You can use a hyperlink on top which will take you to the Web page where you can enter string using interactive editor, copy it to the system clipboard and paste back to the When to Run field.

When scheduling scenario you can enable email notifications.
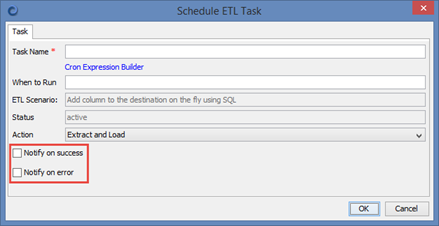
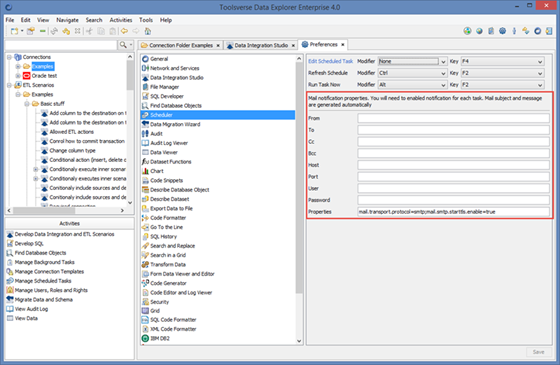
Enabling notifications requires setting up mail preferences under Preferences->Scheduler->Mail Notifications.
Once scenario is scheduled it will be periodically executed by built-in scheduler running on the server. You can change scheduling properties, pause, resume and execute scenario immediately by going to Activities->Manage Scheduled Tasks.

Working with ETL code Snippets
To open ETL code snippets click Code Snippets button in the ETL editor toolbar.
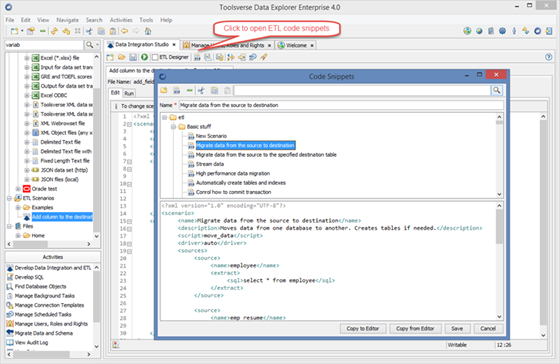
You can add new and modify and delete existing snippets and folders.
Exporting ETL Configuration to be used by standalone ETL Framework
You can create, modify, run and schedule ETL scenarios never leaving Data Explorer. Data Explorer can also be an excellent front-end tool for the standalone ETL Framework. Besides creating ETL scenarios there are two options within Data Explorer to support ETL Framework:
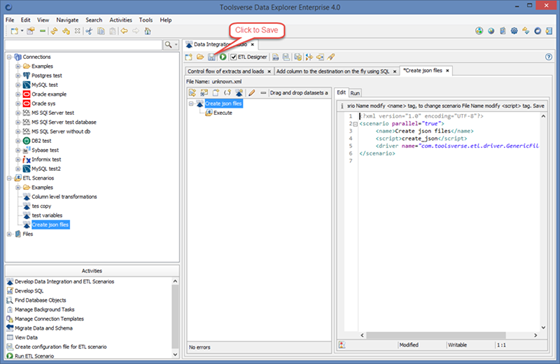
Create configuration file for ETL Scenario
Using this option you can create a configuration file for the ETL framework which will include scenario opened in the current tab, connections and variables set for the current scenario and connection properties for all connections used by the scenario. This configuration file can be used by ETL Framework as is. When passed to the framework as a parameter it will trigger execution of the particular scenario with a particular set of connections and variables.
To create a configuration file for the ETL Scenario click Create configuration file for ETL Scenario button in the ETL editor toolbar, enter file name and click OK.
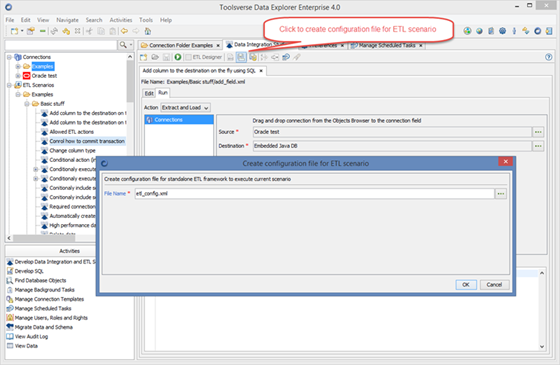
If entered File Name does not include a path the file will be created in the DATA_EXPLORER_HOME\config directory.
Create configuration file for standalone ETL Framework
Using this option you can export all connections specified under Connections node in the Data Explorer.
You will need to modify scenario to execute and connections to use in order for ETL Framework to use this file.
To create a configuration file for the standalone ETL Framework select Tools->Create configuration file for standalone ETL framework, enter file name and click OK.
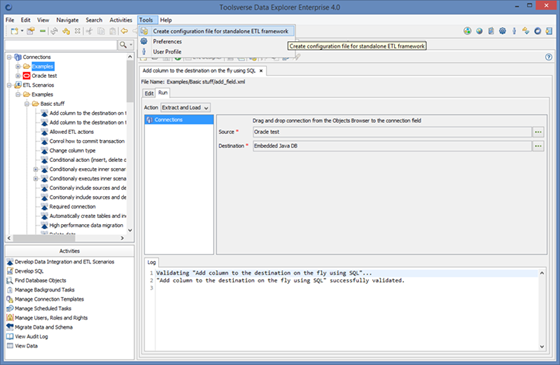
If entered File Name does not include a path the file will be created in the DATA_EXPLORER_HOME\config directory.
Enabling audit for ETL
When Data Explorer runs in the client-server or Web modes the audit of the ETL scenarios is enabled by default. It means that each time scenario is executed Data Explorer updates audit log with information about who and when executed what and what was the outcome.
You can view audit log by selecting Activities->View Audit Log.
You can disable audit for ETL by changing Preferences->Audit->Enable Audit for ETL.
Migrating Data and Schema Objects
Data Migration cannot be easier. Just drag and drop all your data sources, regardless of format and location, specify destination and click “Migrate” button. Schema objects such as tables, indexes and files will be automatically created and data copied to destination using best algorithm possible.
The following data migration features are available:
· Any-to-any data migration
· No coding involved
· Automatic creation of the schema objects such as tables, indexes and files
· Drag and drop any data source including file-based
· Support for multiple heterogeneous data sources in one data migration scenario
· Easy performance tuning
To migrate data and schema objects select Activities->Migrate Data and Schema.
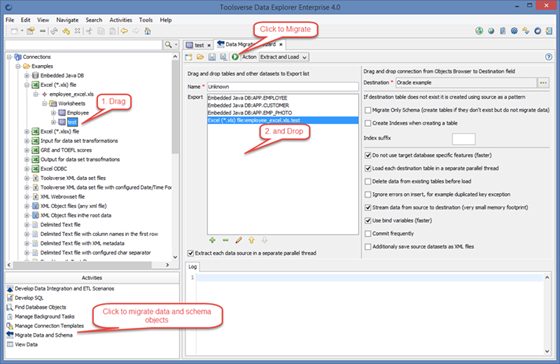
Creating and Executing Data Migration Scenarios
You can use drag and drop to add datasets to the Export list and to specify a Destination connection.
You can edit Export list by re-ordering datasets to export and adding and removing datasets using controls on the bottom of the Export list. You can also change destination table name for each dataset. For example if source table is EMPLOEE you can rename it to company_employee in the destination.

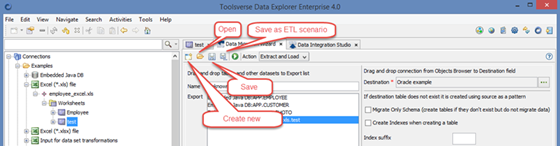
The following actions are available when working with data migration scenarios:
· To create a new data migration scenario click Create New Data Migration Scenario button.
· To save data migration scenario you need to specify a Name and click Save Data Migration Scenario button.
· Already saved scenario can be loaded and used again. To load scenario click Open Existing Data Migration Scenario button.
· To save data migration scenario as ETL Scenario to be used by either Data Integration Studio or standalone ETL Framework click Save as ETL Scenario button.
By default system is configured to use high performance data migration algorithm. You can change parameters.
Available parameters:
· Extract each data source in a separate parallel thread – if this option is enabled extracting of each dataset such as table, Excel spreadsheet, etc. is performed in its own parallel thread
· Migrate Only Schema – if this option is enabled only schema objects such as tables and indexes will be created in destination
· Create Indexes when creating a table – if this option is enabled indexes will be created along with tables in the destination. Data Explorer will use source indexes as a pattern
· Index suffix – if not empty suffix will be added to the each created index name. The purpose is to prevent creating duplicated objects in the destination schema
· Do not use target database specific features – if this option is enabled data migration most likely will be performed faster
· Load each destination in a separate parallel thread – if this option is enabled loading of data for dataset such as table, Excel spreadsheet, etc. is performed in its own parallel thread
· Delete data from existing tables before load – if this option is enabled Data Explorer truncates destination tables before loading data
· Ignore errors on insert, for example duplicated key exception - if this option is enabled and there is an exception when insert SQL statement is executed it is ignored
· Stream data from source to destination – if this option is enabled Data Explorer reads data row by row and performs insert (append for files) immediately. Data are not accumulated in memory which allows moving practically unlimited datasets
· Use bind variables - if this option is enabled Data Explorer prepares insert SQL statements and uses bind variables. It also uses batch processing. Both technics allow faster data migration
· Commit frequently - if this option is enabled Data Explorer performs database commit after each executed insert statement
· Additionally save source dataset as XML files - if this option is enabled Data Explorer saves each extracted dataset as XML file in the Toolsverse XML dataset format which includes data and metadata such as column names and data types
To run data migration scenario click Migrate button in the Data Migration Wizard toolbar. Additionally you can choose between Extract and Load and Extract Action types. If you chose to do Extract only Data Explorer will create XML files in the Toolsverse XML dataset format in the DATA_EXPLORER_HOME\data directory for each extracted dataset.
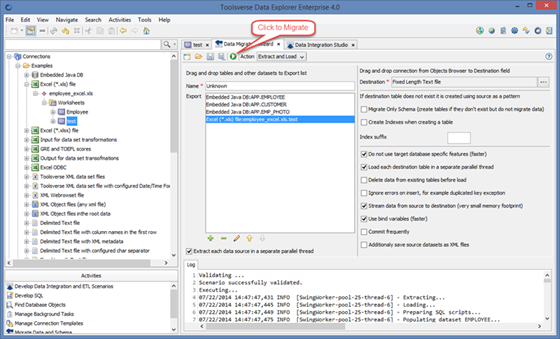
Data migration is performed in the background so you can continue working while it is running. System automatically redirects output to the Log tab so you can watch progress in real time. You can cancel data migration at any time.
Configuring Data Migration Wizard
To configure Data Migration Wizard go to Preferences->Data Migration Wizard.
Working with Databases
Data Explorer includes a fully integrated Universal Database Development IDE.
The following features are available when working with databases:
· Schema browser
· Database objects search
· Ability to view and edit table’s data
· Support for CLOB, BLOB, user defined, and hierarchical data types and arrays
· Visual SQL designer with drag and drop support
· SQL-dialect-aware code editor
· Offline code parsing and syntax errors reporting
· Color highlighting
· Database aware code completion
· Code snippets
· SQL code formatting
· Multiple tabs for multiple connections
· Manual and automatic transaction management
· Execute multiple SQL statements with output to individual tabs
· Execute selected SQL statements
· Execute SQL statements with parameters which can be stored between sessions
· Execute SQL in background with ability to abort it
· Execute stored procedures and function from the editor and schema browser
· Support for output parameters including cursors, pipeline functions and resultsets returned by functions
· In place “describe” for tables, views and synonyms
· Auto-generate code such as create, drop, select, update, merge, insert, etc for databases objects from the schema browser and code editor
· Extended database support:
o Execute SQL in the external tool
o Display explain plan
o Display auto trace and performance tuning information
o Display dbms output
· Ability to schedule SQL (enterprise edition)
· Ability to execute SQL by the server component (enterprise edition)
· Ability to define roles and rights for the developers (enterprise edition)
· Audit for SQL statements (enterprise edition)
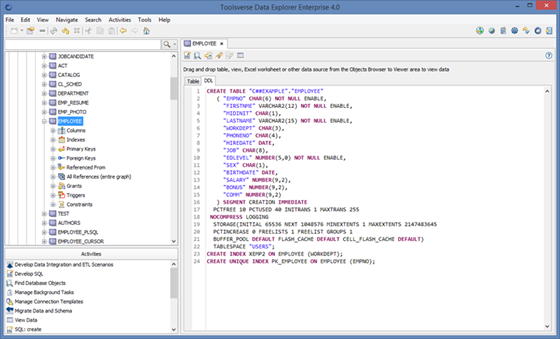
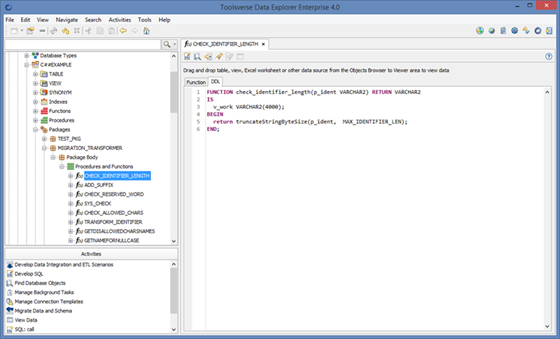
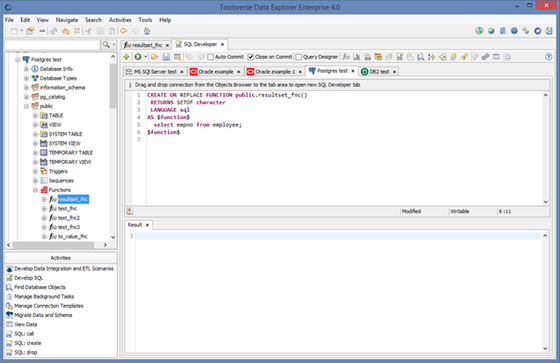
Browsing Database Objects
To browse database select a connection in the Objects Browser and expand the node. Data Explorer supports a wide selection of database object types for the most widely used databases.
When specific database object has DDL you can see it in the second tab.
Table DDL:
Function inside Oracle package:
Finding and Filtering Database Objects
There are two ways to search for database objects:
By using Find Database Objects activity
Select Activities->Find Database Objects. Fill in search criteria’s and click Search button.

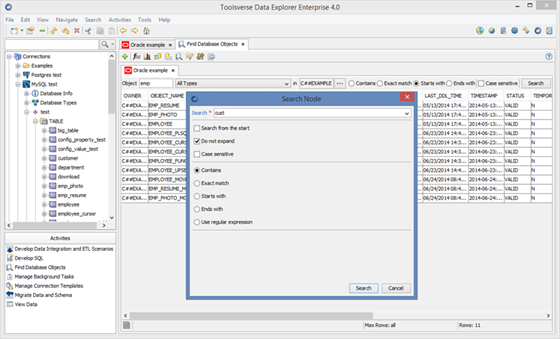
By finding objects using Objects Browser built-in search
You can use Objects Browser search and filter functionality.
To search for the object select a text field in the search toolbar, enter text to search and press Enter. Extended search provides more search options. To use extended search select Search->Search Node.
When filter option is available you can filter objects. For example when looking for a particular table you can select a Table node in the Objects Browser, enter part of the table name and select Set Filter. To clear filter clear the text field and select Set Filter again.

Viewing Entity Relationships
There are two options for discovering an entity relationships between database tables:
Using Referenced From
This option displays all tables from which selected table is referenced from.

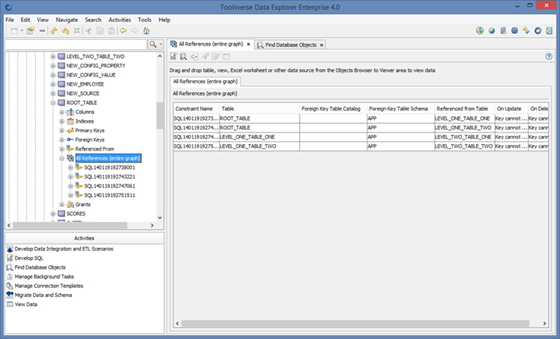
Using All References
This option displays entire graph of the relationships starting from the selected table.
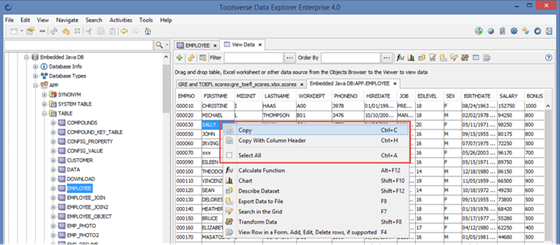
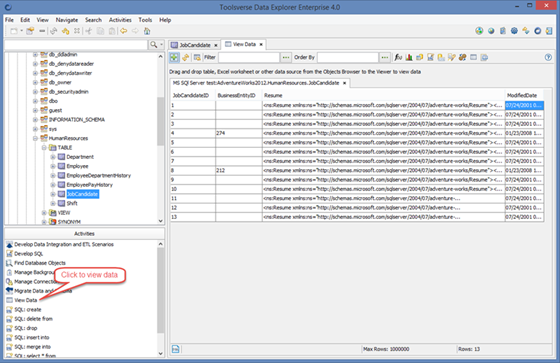
Viewing Tables, Views, Synonyms, etc.
Using Data Explorer you can view data in Tables, Views, Synonyms and other table-like database objects.
To view table’s data select a table in the Object Browser and select Activities->View Data.
To view selected row in a form click View Row in a Form button.
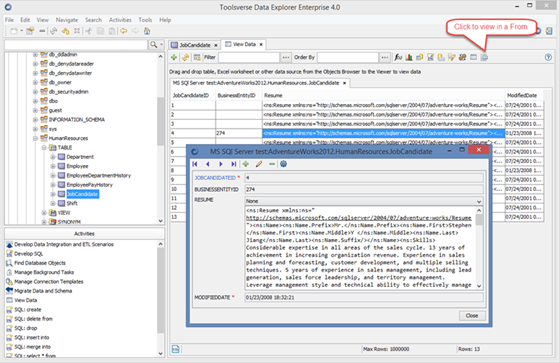
Data Explorer supports CLOBs, BLOBs, arrays, user defined and hierarchical data types.
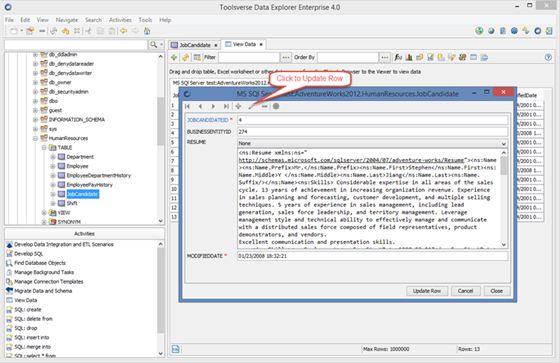
Editing Tables, Views, Synonyms, etc.
To edit table open Form Viewer for the row, click Update row button and follow instructions on the screen. You can also Insert and Delete rows. When working with BLOB data types you can upload images.
By default editing is enabled for tables only. You can enable it for views, synonyms and other table-like database objects by changing settings under Preferences->From Data Viewer and Editor.
Creating and profiling SQL queries and scripts
Working with SQL Editor
Data Explorer contains SQL Editor used to edit SQL scripts. You can open multiple tabs for multiple database connections.
The following functionality is available when using SQL editor:
· Offline background SQL parsing and syntax errors reporting
· Color highlighting
· Code completion
· Code snippets
· SQL code formatting
· Loading and saving SQL scripts
· Multiple tabs for multiple connections
To open SQL editor for the connection select a connection in the Objects Browser and click Activities->Develop SQL. You can open SQL editor even when there is no connection selected in the Objects Browser.
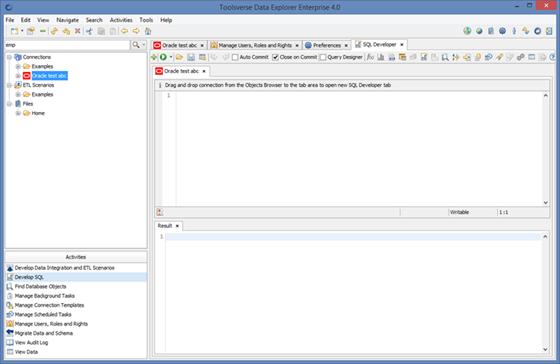
The editor area looks like this:
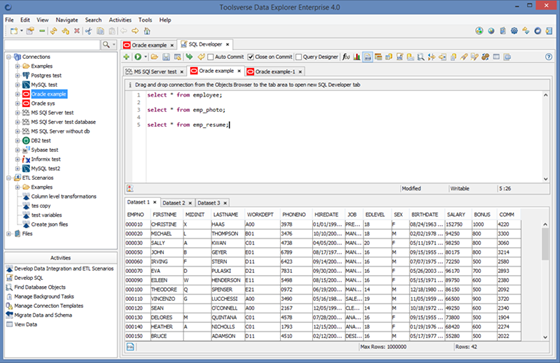
To add new tab for any connection click Select a Connection to open new SQL Developer tab button.
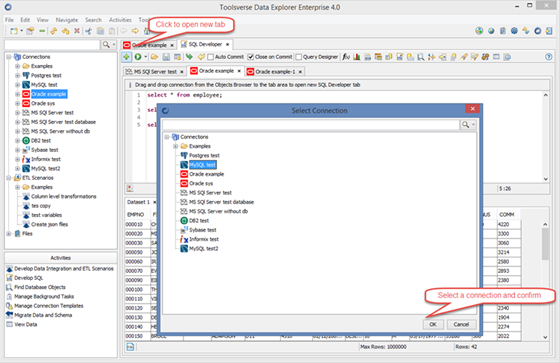
Alternatively you can drag and drop connection from the Objects Browser to the tab area of the SQL editor or use shortcuts from other opened tabs.
Using auto completion
SQL editor supports auto completion for SQL keywords and column names. To activate auto completion use Ctrl+Space.
Formatting SQL Code
To format SQL code click Format Code button.
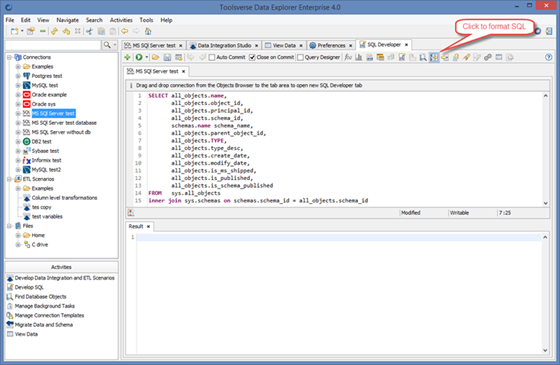
You can change formatting options under Preferences->SQL Code Formatter.
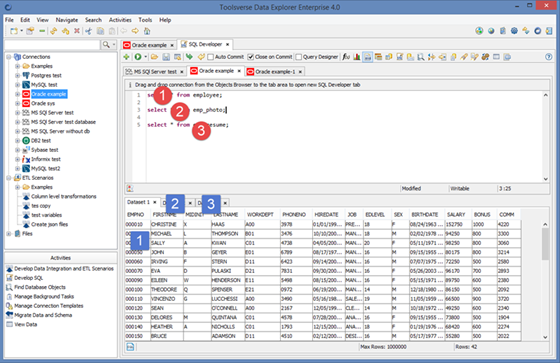
Creating Queries and SQL scripts using SQL Editor
When creating queries or SQL statements separate them using semicolon (;) character. Queries separated by semicolon can be executed by one click with output to different tabs.
When writing SQL scripts such as stored procedure or anonymous SQL block use whatever SQL syntax is appropriate for the database.
For comments use /* comment here */ and -- comment here.
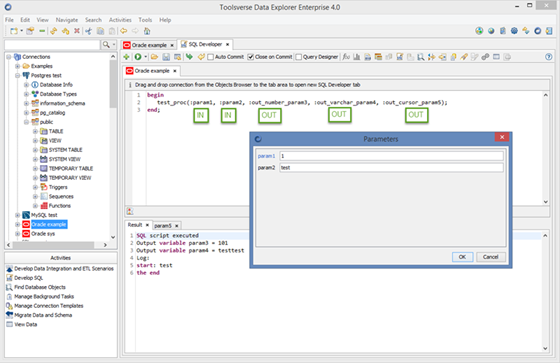
Using Bind Variables in SQL
You can use bind variables in the SQL queries and scripts.
For input parameters use :name or :name_type
For output parameters use :out_name_type.
Where type is number, varchar, char, cursor, boolean, date, timestamp, time.
Data Explorer will automatically parse SQL, request input parameters and display values of the output parameters if any exist.
Working with Syntax Errors
SQL editor constantly checks for syntax errors in the background. When any error is found Data Explorer displays it in the bottom of the editor.
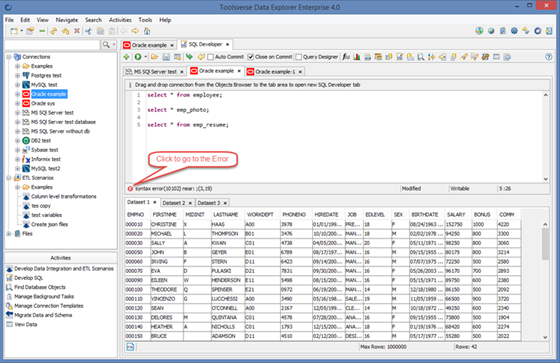
When you correct an error the error message disappears.
You can disable background error checking by changing Preferences->SQL Developer->Display SQL errors.
Executing SQL Queries and Scripts
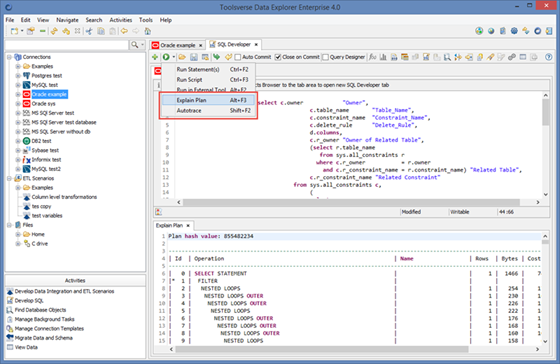
To execute SQL query or script click Choose how to Run SQL button:
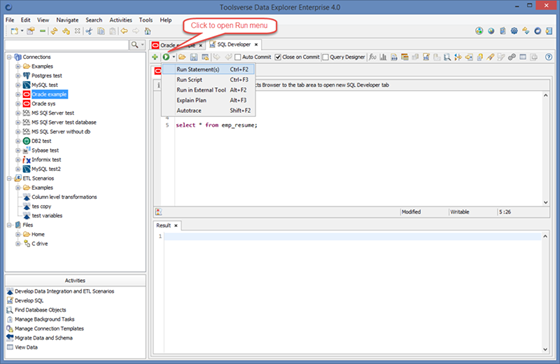
There are three options:
· Run Statements(s) – execute semicolon (;) delimited SQL statements with output to the separate tabs
· Run Script – execute stored procedure, function or anonymous SQL block
· Run in External Tool – if there is a support for the external tools for the particular database Data Explorer will launch it and redirect output to the Data Explorer result tab
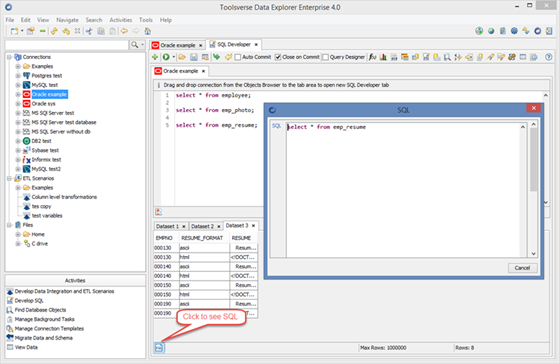
Data Explorer always tries to execute selected in the SQL editor text first and if nothing is selected it executes entire editor’s buffer:
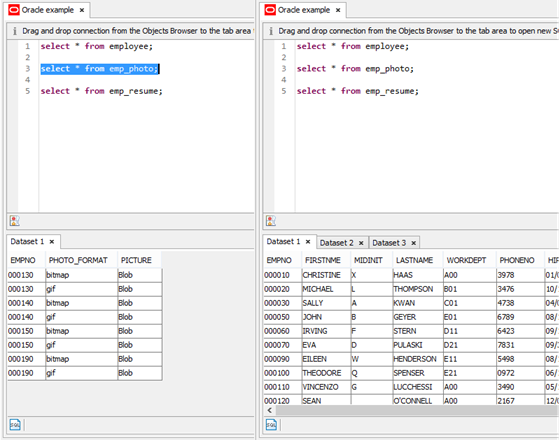
To see what SQL query belongs to what tab click Display SQL used to populate this tab button.
Profiling SQL Queries
For each supported database there are multiple profiling options:
|
Database |
Option 1 |
Option 2 |
Option 3 |
To configure |
|
Oracle |
Explain Plan |
Autotrace |
Support for dbms.output |
Preferences->Oracle->Autotrace Options |
|
DB2 |
Explain Plan |
Execution Plan with Snapshot |
|
|
|
MS SQL Server |
Explain Plan |
IO and Time Statistics |
|
|
|
MySQL |
Explain Plan |
|
|
|
|
PostreSQL |
Explain Plan |
Analyze |
|
|
|
Sybase ASE |
Explain Plan |
IO and Time Statistics |
|
|
|
Informix |
Explain Plan |
Show Execution Plan and avoid Execution |
|
|
To profile SQL query click Choose how to Run SQL button and choose a profiling option.
Creating Queries using Query Designer
In Data Explorer you can create SQL queries using drag and drop and without actually writing SQL.
To enable Query Designer click on Query Designer check box.
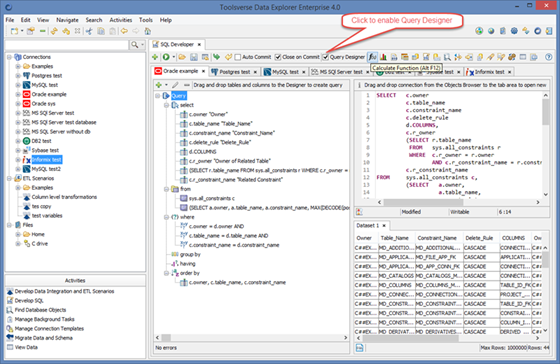
Use drag and drop from the Objects Browser to add tables and columns to the query.
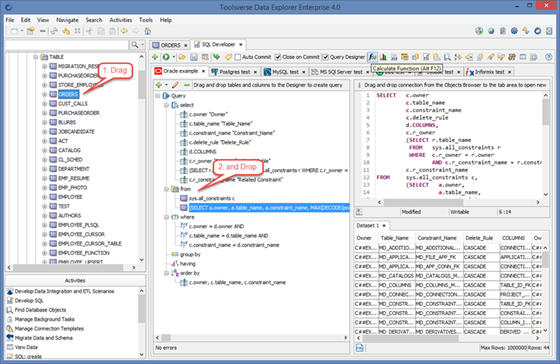
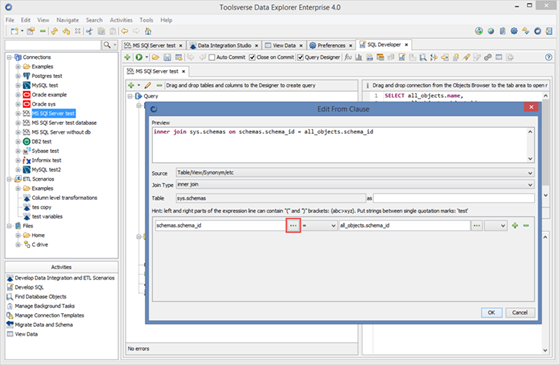
Use right click popup menu or designer’s toolbar to modify query.
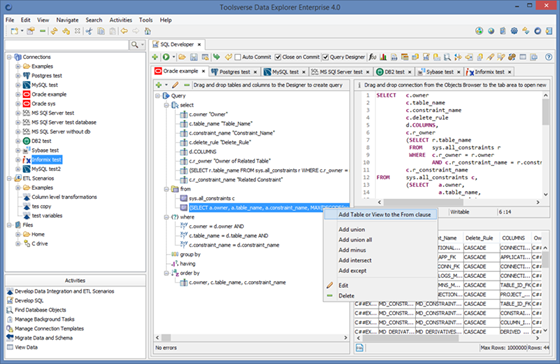
When working with interactive wizards look for a […] button to selected columns.
Configuring SQL Editor and Designer
To configure SQL editor and Query Designer go to Preferences->SQL Developers.
Executing Stored Procedures and Functions
With Data Explorer you can execute stored procedures and functions right from the Objects Browser and without writing a code. Data Explorer supports:
· Automatic parsing of the input and output parameters
· Automatic creation of the request form for the input parameters
· Support for stored procedures and functions inside packages
· Support for reference cursors, pipelined functions, functions which return datasets
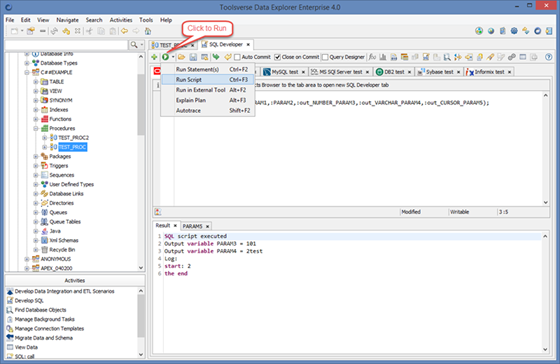
You can execute stored procedure or function in three easy steps:
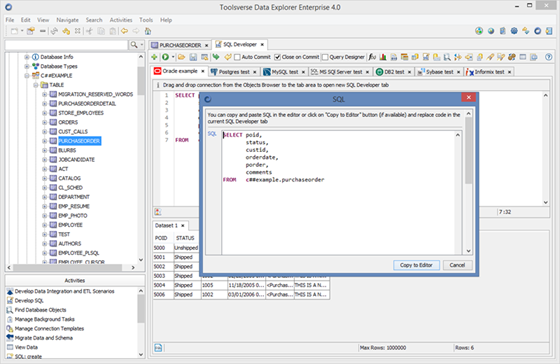
1. Open SQL editor for the connection, select stored procedure or function in the Objects Browser, right click and choose SQL: call.
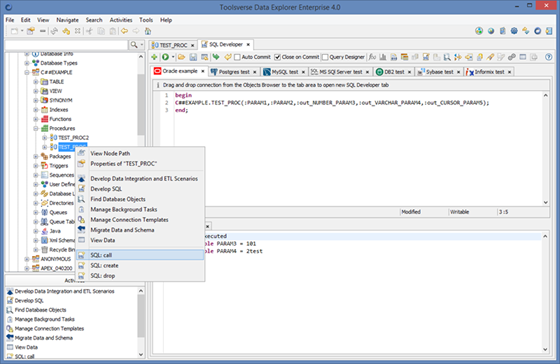
2. Data Explorer will automatically generate calling code and display it in the popup window. Click Copy to Editor button or manually copy and paste SQL to the editor.
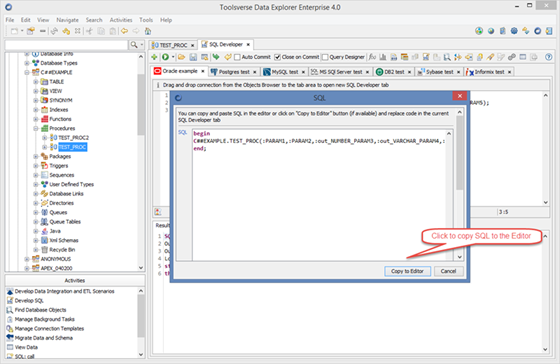
3. Click Run button and select Run Script from the popup menu. Enter input parameters and click OK.
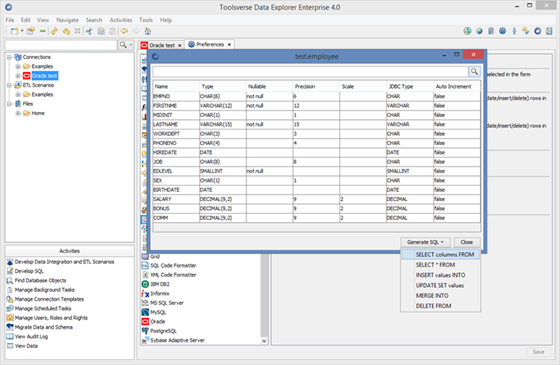
Scripting Database Objects
Scripting is an ability to auto-generate INSERT, UPDATE, DELETE, MERGE, SELECT, CREATE and DROP SQL statements for the database object.
Data Explorer supports scripting for the most database object types for all natively supported databases. It supports scripting for tables for all databases.
To script database object select it in the Objects Browser, right click and select type of the SQL statement.

Copy SQL to the editor if needed.
You can change how Data Explorer generates INSERT, UPDATE, DELETE, MERGE, SELECT SQL statements by changing configuration options under Preferences->Code Generator->SQL code generator settings.
Handling Transactions
How Database Explorer handles transactions by default depends on the Auto Commit flag for the particular connection.
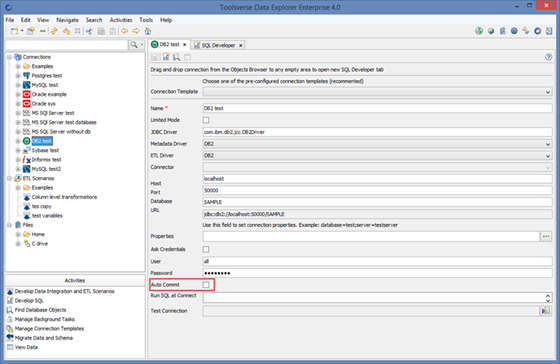
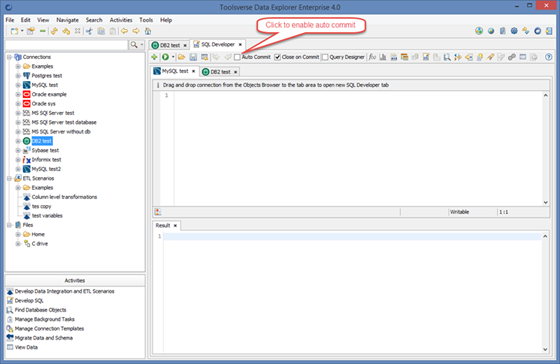
Auto Commit Off means that you need to manually commit transactions. Use Commit and Rollback buttons in the SQL editor toolbar.
You can change Auto Commit settings for the current session in the SQL editor.
When Auto Commit is Off you can configure Data Explorer to close connection on each commit or rollback.
To change default settings for transactions handling in the SQL editor go to Preferences->SQL Developer.
Describing Database Objects
Describing database objects is an ability to display dataset columns, column types and constraints without using of Objects Browser.
You can describe database objects such as tables, views and synonyms right from the SQL editor.
To describe object put cursor within boundaries of the object or select it and click Describe Database Object button.
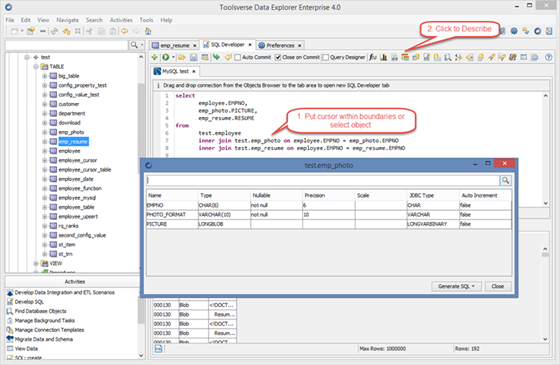
Data Explorer can generate INSERT, DELETE, UPDATE, MERGE and SELECT SQL statements right from the describe popup window.
To generate SQL click Generate SQL button and select SQL type from the popup menu.
Working with SQL code Snippets
Data Explorer includes code snippets (useful fragments of SQL code) for all supported databases.
To open SQL code snippets click Code Snippets button in the SQL editor toolbar.
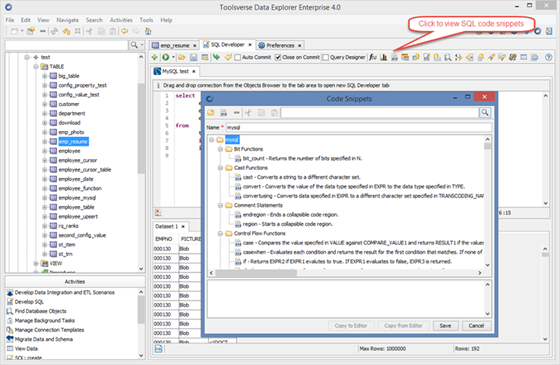
You can add new and modify and delete existing snippets and folders.
Working with SQL History
Data Explorer remembers executed SQL statements, scripts and bind variables.
You can view history of executed SQL statements right from the SQL editor. To view history click SQL History button in the SQL editor toolbar.
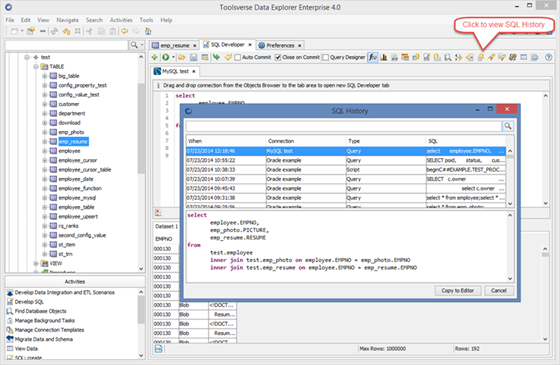
You can change default number of SQL statements which Data Explorer can remember by changing Preferences->SQL Developer->SQL History Size.
Scheduling SQL
You can schedule SQL using built-in crone-based scheduler.
Note. Since scheduler runs on the server you can schedule SQL only when using Data Explorer Enterprise edition and only in the client-server or Web modes.
To schedule SQL click Schedule button in the SQL editor toolbar, fill in all required fields and click OK.
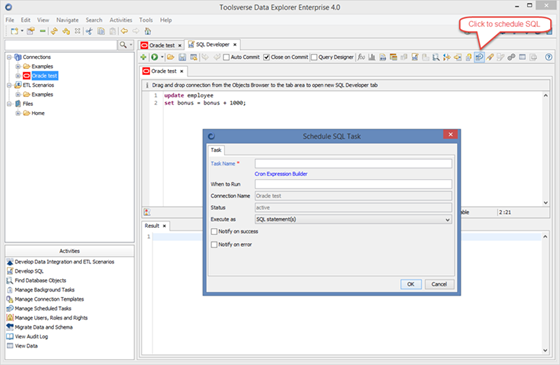
When specifying When to Run SQL you need to enter a standard cron scheduling string. You can use a hyperlink on top which will take you to the Web page where you can enter string using interactive editor, copy it to the system clipboard and paste back to the When to Run field.
When scheduling SQL you can enable email notifications.
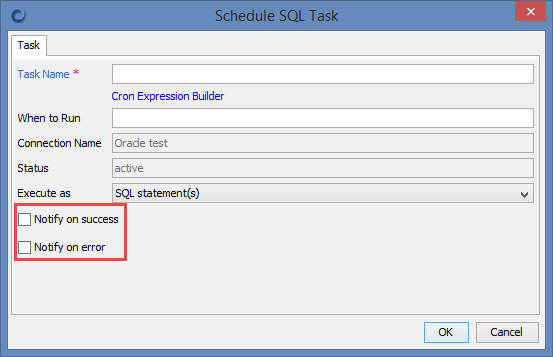
Enabling notifications requires setting up mail preferences under Preferences->Scheduler->Mail Notifications.
Once SQL is scheduled it will be periodically executed by built-in scheduler running on the server. You can change scheduling properties, pause, resume and execute scenario immediately by going to Activities->Manage Scheduled Tasks.
Enabling audit for SQL
When Data Explorer runs in the client-server or Web modes you can enable audit for SQL scripts. It means that each time SQL is executed Data Explorer updates audit log with information about who and when executed what and what was the outcome.
You can view audit log by selecting Activities->View Audit Log.
By default audit for SQL is disabled. You can enable it by changing Preferences->Audit->Enable Audit for SQL.
Working with Files
In addition to SQL databases in Data Explorer you can work with Non SQL data sources such as JSON, XML, etc. files.
The full list of the supported data formats:
· XML
· XML with transformation
· JSON
· Delimited text
· Fixed-length text
· Excel XLS
· Excel XLSX
· HTML
Additionally Data Explorer can display binary files such as images.
The following features are available when working with files:
· Display dataset as a grid, form and chart
· Display binary and large text data
· View multidimensional and hierarchical datasets
· Display and search metadata such as system catalog, dataset columns, etc. for all supported data formats
· Search in dataset
· Describe dataset
· View datasets using pre-configured connections
· View Non SQL datasets as well as files and directories on the local file system, FTP, SFTP and HTTP servers
· Perform file operations such as create, copy, move, delete and rename
· Export dataset to any supported format
· Apply statistical functions to the dataset of selected part of the dataset
· Interactively transform dataset using following transformations:
o Add dimension, Extract dimension
o Join, Intersect, Minus, Union, Union all
o Filter, Order by
o Deformalize, Pivot, Remove Duplicates
o Transpose, Matrix
Data Explorer can read and write files in the local hard drive or in the remote server.
The full list of the supported I/O protocols:
· File
· FTP
· SFTP
· HTTP
· SMTP
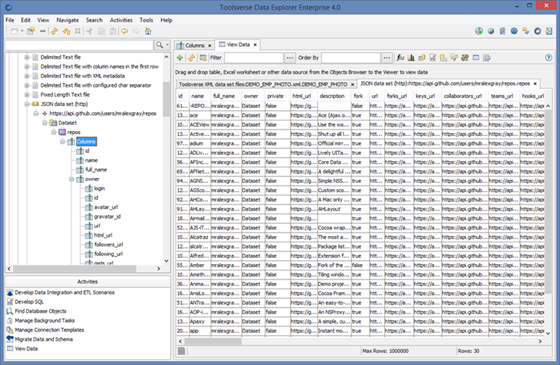
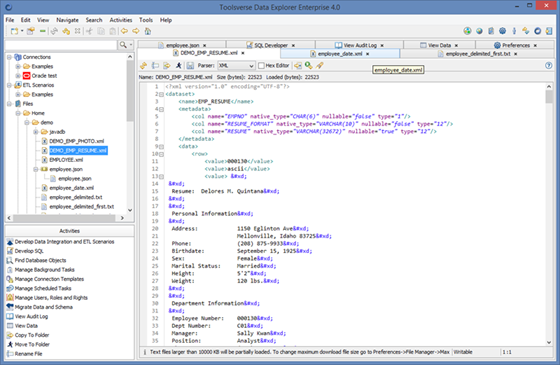
Browsing and Viewing Files using File Connections
Once file connection is created you can browse and view files right from the Objects Browser.
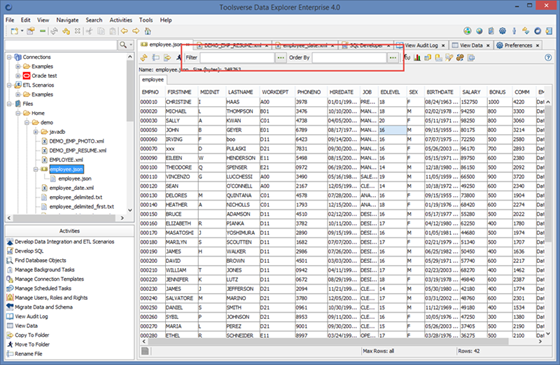
To view file content as a dataset expand connection node to the viewable destination and click Activities->View Data.
The viewable destinations are different for different file types:
|
File type |
Viewable destination |
|
XML |
Connection->File->Dataset->Name |
|
JSON |
Connection->File->Dataset->Name |
|
Delimited text |
Connection->File->Dataset->Name |
|
Fixed-length text |
Connection->File->Dataset->Name |
|
Excel XLS |
Connection->File->Worksheet->Name |
|
Excel XLSX |
Connection->File->Worksheet->Name |
Select to view:
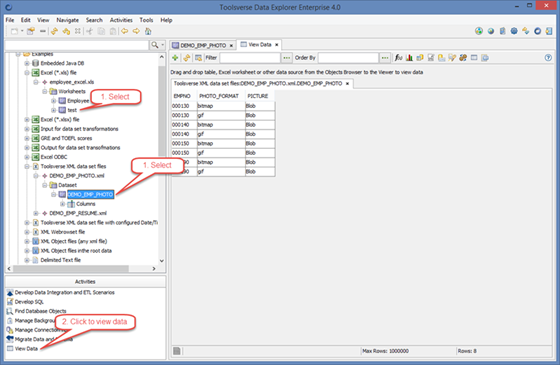
When browsing files using pre-configured file connections Data Explorer can also display metadata such as column names and data types.
Browsing and Viewing Files using File Manager
The alternative way to browse and view files is a File Manager.
In order to use File Manager you need to add root folder to start browsing. There are several types of root folders and you can have unlimited number of them.
|
Folder Type |
Available in |
What it is |
|
Home Folder |
All modes |
· In desktop mode – DATA_EXPLORER_HOME\data · In client-server mode – SERVER_ DATA_EXPLORER_HOME\data and SERVER_DATA_EXPLORER_HOME\data\user · In Web mode - SERVER_ DATA_EXPLORER_HOME\data and SERVER_DATA_EXPLORER_HOME\data\user |
|
Local Folder |
Desktop and client-server modes |
Any locally available folder, for example c:\ |
|
FTP Site |
All modes |
Any FTP site |
|
SFTP Site |
All modes |
Any SFTP site |
Adding new root folder to the Objects Browser
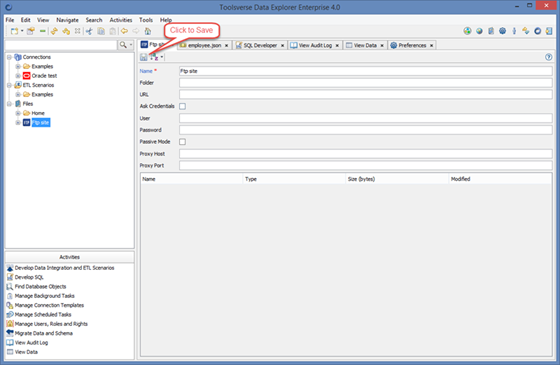
To add new root folder select Files node in the Objects Browser (1), open File menu and select folder type (2).
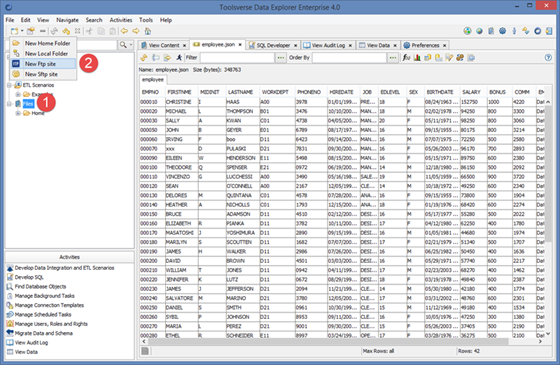
Enter all required fields and click Save button.
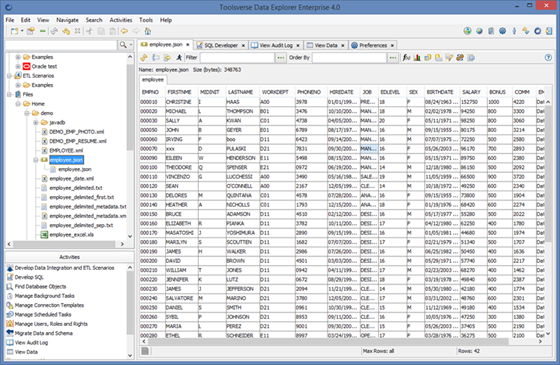
Once root folder is added to the Objects Browser you can expand it to view files and folders just like with any other file manager.
Viewing, editing, creating, coping, moving, deleting and renaming files and folders
Data Explorer natively supports many widely used files types.
The following features are available for the different file types:
|
File Type |
Create |
Copy/Move/Delete/Rename |
Edit |
Edit in the Hex Editor |
View |
View as a dataset |
Zoom |
Open in SQL Editor |
|
Text files |
Yes |
Yes |
Yes |
Yes |
Yes |
No |
No |
No |
|
SQL files |
Yes |
Yes |
Yes |
Yes |
Yes |
No |
No |
Yes |
|
Excel XLS files |
No |
Yes |
No |
No |
Yes |
Yes |
No |
No |
|
Excel XLSX files |
No |
Yes |
No |
No |
Yes |
Yes |
No |
No |
|
JSON files |
Yes |
Yes |
Yes |
Yes |
Yes |
Yes |
No |
No |
|
XML files |
Yes |
Yes |
Yes |
Yes |
Yes |
No |
No |
No |
|
Image files |
No |
Yes |
No |
Yes |
Yes |
No |
Yes |
No |
|
Binary files |
No |
Yes |
No |
Yes |
Yes |
No |
No |
No |
|
Folder |
Yes |
Delete and Rename only |
No |
No |
Yes |
No |
No |
No |
Editing XML file:
Changing File Manager configuration options
You can change File Manager configuration options under Preferences->File Manager.
Working with Datasets
When working with datasets the following features are always available:
· Ad-hoc filtering and sorting
· Searching in dataset
· Viewing row in a Form Viewer
· Exporting dataset to the files
· Creating charts
· Transforming dataset
· Applying statistical and date functions
· Describing dataset
Additinaly when working with databases (in opposite to file formats) you can insert, update and delete rows in tables, views and synonyms. Editing of CLOB fields as well as uploading images into BLOBs are supported.
Currently the following activities imply working with datasets:
· Database development
· Data discovery and visualization
· Working with files
· Viewing audit log
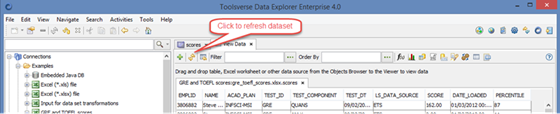
Refreshing, Filtering and Sorting Dataset
To refresh dataset click Refresh button.
When working with datasets use interactive editors to filter and sort data.
Editors create SQL-like where and order by expressions.
When working with SQL datasets you can use any function supported by database. For Non SQL datasets you can use JavaScript.
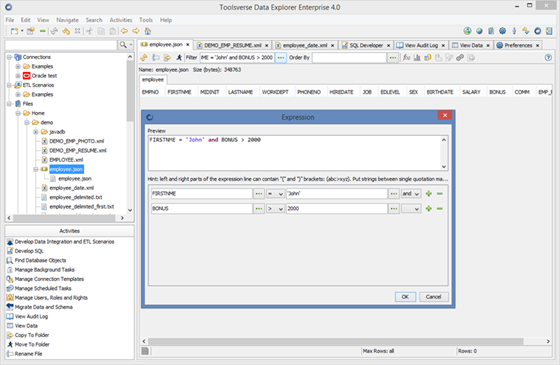
When sorting dataset you can use desc and asc suffixes.
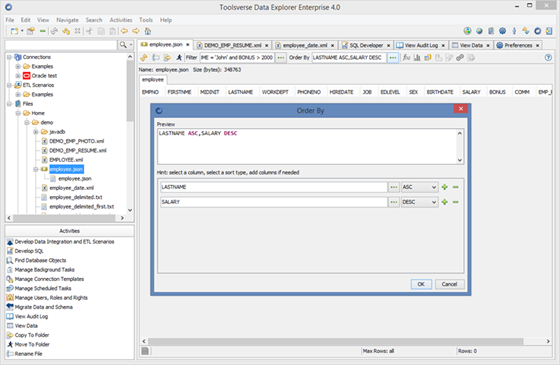
Alternatively you can just type in expression right in the Filter or Order By field.
Searching in Dataset
To search in the dataset click Search in Dataset button, enter search criteria’s and click Search.
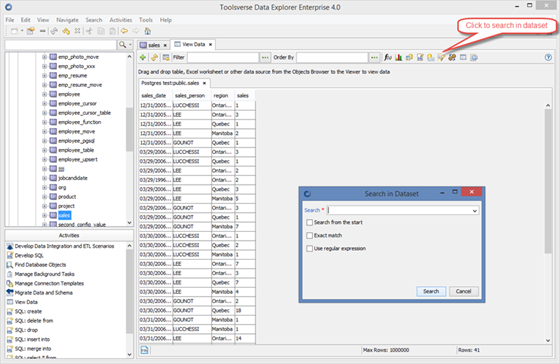
Data Explorer will select a cell which satisfies search conditions.
Exporting Dataset
You can export dataset to any supported file format.
To export dataset click Export Dataset to File button, select file format in Export To dropdown, enter required fields and click Export button.
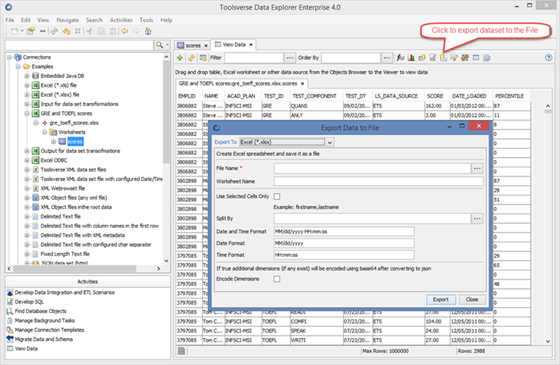
If you choose to you can export selected cells only and you can create multiple files by splitting dataset on chunks using key fields defined by Split By.
If source dataset has multiple dimensions (for example multidimensional JSON) but destination format does not support dimensions, you can choose to convert entire dimension to JSON and encode it as a string using base64.
Creating Charts
You can create different types of charts, including 3D and charts with multiple series.
To create a chart click Chart button, select Chart Type, enter required fields and click Display Chart button.
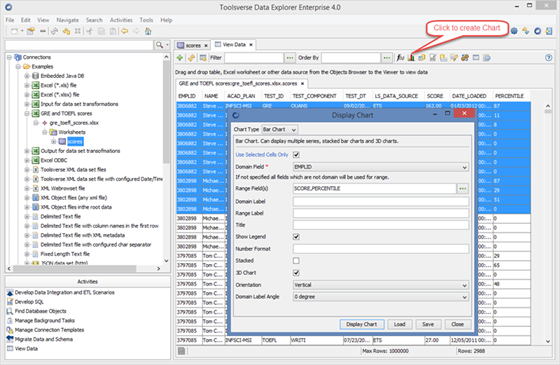
If you choose to you can create chart for the selected cells only.
Transforming Dataset
You can transform any dataset right from Data Explorer using a wide selection of interactive transformations such as:
· Add dimension, Extract dimension
· Join, Intersect, Minus, Union, Union all
· Filter, Order by
· Deformalize, Pivot, Remove Duplicates
· Transpose, Matrix
To transform dataset click Transform Dataset button, select transformation in Transform Using dropdown, enter required fields and click Transform button.
Data Explorer replaces exiting dataset with a dataset produced by selected transformation. You can apply multiple transformations in a row and you can always return back to the original dataset by clicking Refresh button.
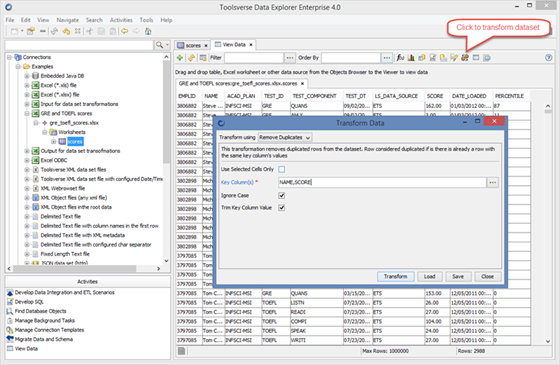
If you choose to you can transform selected cells only.
Applying Statistical Numerical and Date Functions
You can apply Statistical Numerical and Date functions to any dataset.
Supported functions:
|
Category |
Functions |
|
Dataset Functions |
· Count · Min · Max |
|
Numeric Functions |
· Avg · Min · Max · Median · Population Variance · Product · Standard Deviation · Sum · Variance |
|
Date Functions |
· Avg · Avg Age · Min · Max · Median · Median Age · Age Standard Deviation |
To calculate a function click Calculate Function button, select Category, enter required fields and click Calculate button.
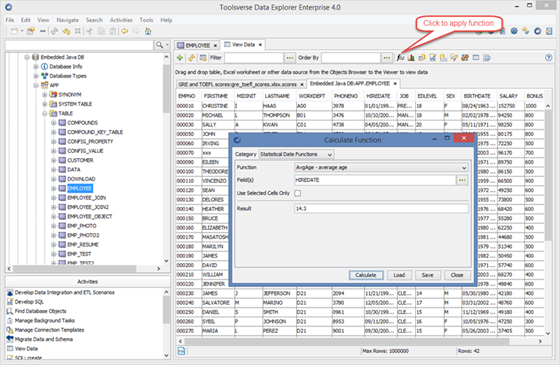
If you choose to you can calculate function for the selected cells only.
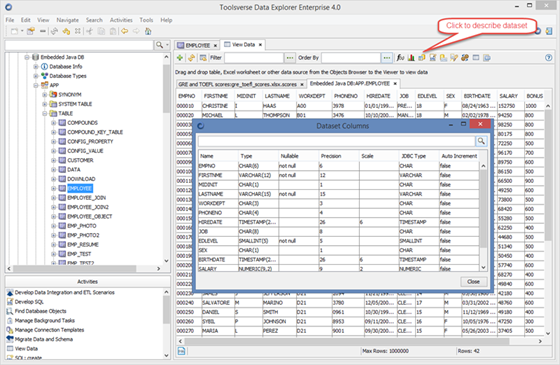
Describing Dataset
Describing dataset means displaying columns, column types and constrains of the dataset.
To describe dataset click Describe Dataset button.
Changing Maximum Number of Rows to Display in the Grid
You can change maximum number of rows which can be displayed in a grid containing dataset.
To change maximum number of rows click Set Grid Defaults button.
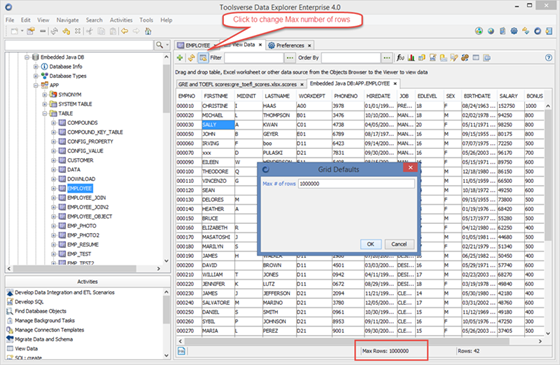
The default value can be changed using Preferences->Grid->Maximum Number of Rows.
Managing Scheduled Tasks
When working in the client-server or Web modes Data Explorer allows to schedule and monitor ETL and SQL tasks.
To manage already scheduled tasks and view results select Activities->Manage Scheduled Tasks.
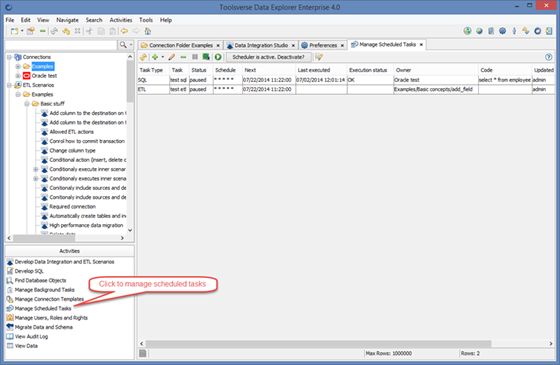
Using this activity you can:
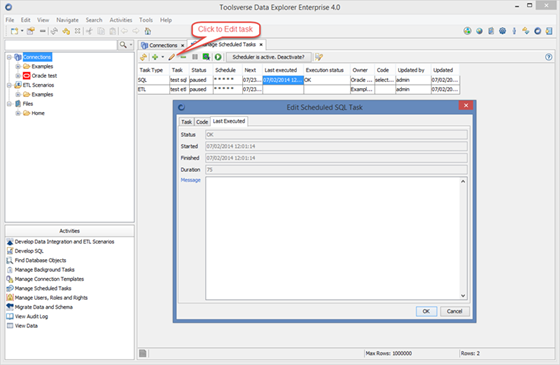
· View and Edit existing task
· Pause task
· Resume task
· Execute task immediately
· Deactivate and activate scheduler
Editing task:
Changing scheduler configuration properties
You can change scheduler configuration properties under Preferences->Scheduler.
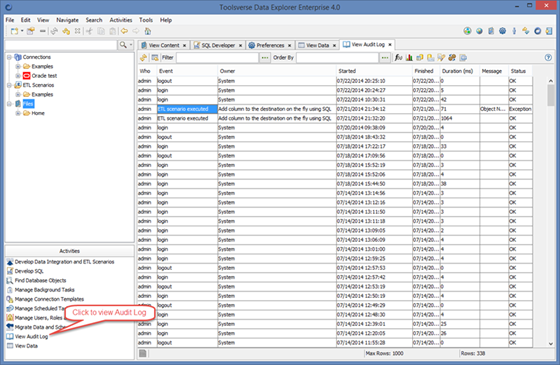
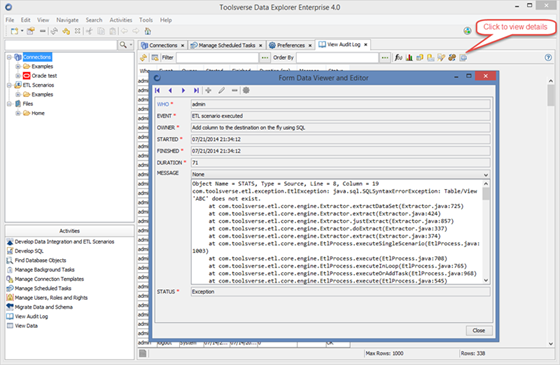
Viewing Audit Log
When working in the client-server or Web modes Data Explorer automatically updates audit log for events such as:
· Login and logout
· Execution of the scheduled task
· Execution of ETL scenario
· Execution of the SQL script
To view audit log select Activities->View Audit Log.

To view details of the particular event click View Row in a Form button.
Viewing Application Log
Desktop and server components of the Data Explorer update file-based log located under DATA_EXPLORER_HOME\log.
To change logging options modify DATA_EXPLORER_HOME\config\log4j.properties.